
When developing a reactive web app, you would expect to display data quickly, but it doesn't always happen. Do you know why? Essentially, OutSystems Reactive Apps fetch data asynchronously, so even if you request it with the screen (Screen Initialize and query At Start), it will not be available immediately after rendering the screen.
Asynchronous
“not happening or done at the same time or speed” - Cambridge Dictionary
This article will explore common mistakes when using data on screens and explain how to solve them.
Quick note: the examples in this article were developed in an OutSystems Web Reactive application, using the Service Studio version 11.8.12, based on SQL Server. If you would like to know more about the OutSystems Platform and Service Studio developer tool, please follow the links:
What Is The Difference Between Asynchronous And Synchronous Web Apps?
Before we explore Asynchronous data in detail, let’s first briefly explain the difference between Asynchronous and Synchronous data in the OutSystems Platform.
Synchronous OutSystems Traditional Web Apps
When developing a new OutSystems Traditional Web Application to present data on a screen, you need to use a special action called Preparation. Preparation is a server-side action that fetches data to the screen synchronously. So, if a user requests this page in a Browser, the server will handle his request, preparing the entire screen structure (HMTL+CSS) and behavior (JavaScript), as well as the data. The screen will only be rendered after the Preparation action completes its logic. Thus, the user must wait while the server executes the Preparation Action and fetches all elements before viewing the page. This approach does not provide a good user experience, as it can create a visual delay between the page’s request and its display. This synchronous behavior is how OutSystems Traditional Web Applications execute logic to fetch data.
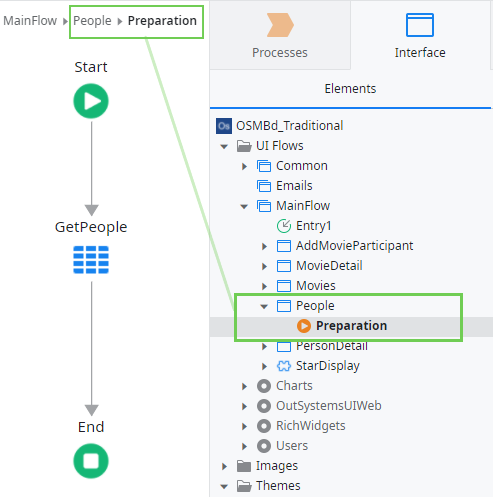
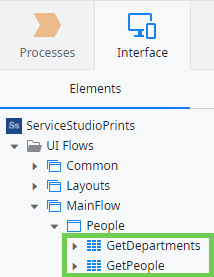
In the People screen, the Preparation action fetches the GetPeople aggregate synchronously to return the list of records of the entity People on the database. Then, on the screen, the output result of this request can be used to display the data in a table.
Asynchronous OutSystems Reactive Web Apps
Conversely, in OutSystems Reactive Web Applications, there is no Preparation Action. So if you want to display data on a screen, you must directly fetch it using Aggregates and Data Actions.
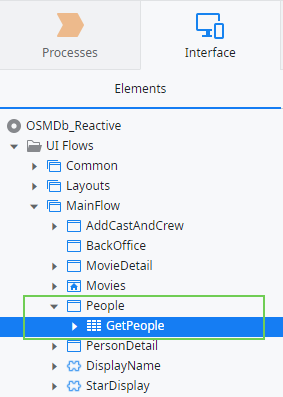
Image #2 represents how you can request data on the People screen. The Preparation action doesn’t exist, and the aggregate GetPeople is added directly to the screen. So how this works?
The big difference is that OutSystems Reactive Web Applications are considered single-page applications. So, once you request the application in the browser, all the code necessary to create the navigation between the screens and its rendering will be available with that first request. If you inspect the code, all the logic and structure of the different screens are already available in the browser. Thus, you don’t have to wait for a response from the server to render the screens through a navigation process.
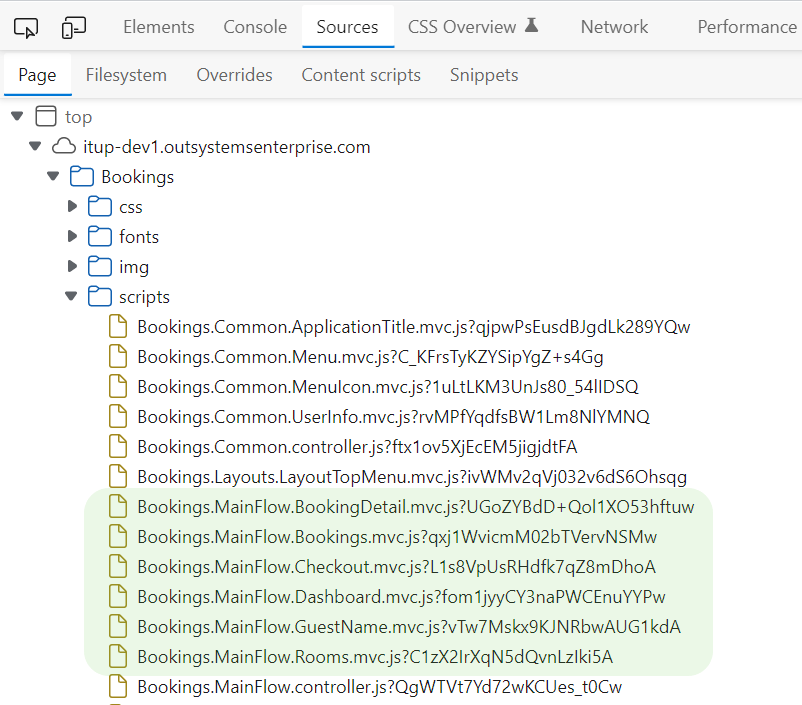
As you can see in image #3, all the scripts used on the different screens are already available in the browser, such as BookingDetail, Bookings, Dashboard, Rooms, etc. What is not available in the browser is the data. We need to fetch it from the database, which is allocated on the server (*). With Reactive apps, the browser doesn't have to wait for the process of fetching the data to finish before rendering the screen. This approach delivers users a better experience, as they can interact with the screen before data is displayed. Once the screen receives the information, it will react to this change and render it. This asynchronous behavior is how OutSystems Reactive Web Applications execute logic to fetch data.
! Check this video and respective documentation to know more about fetching data in Reactive web applications.
(*) Mobile apps can have local storage, which changes this paradigm. However, in this article, we will only cover Reactive Web Applications.
Common Mistakes And How To Avoid Them
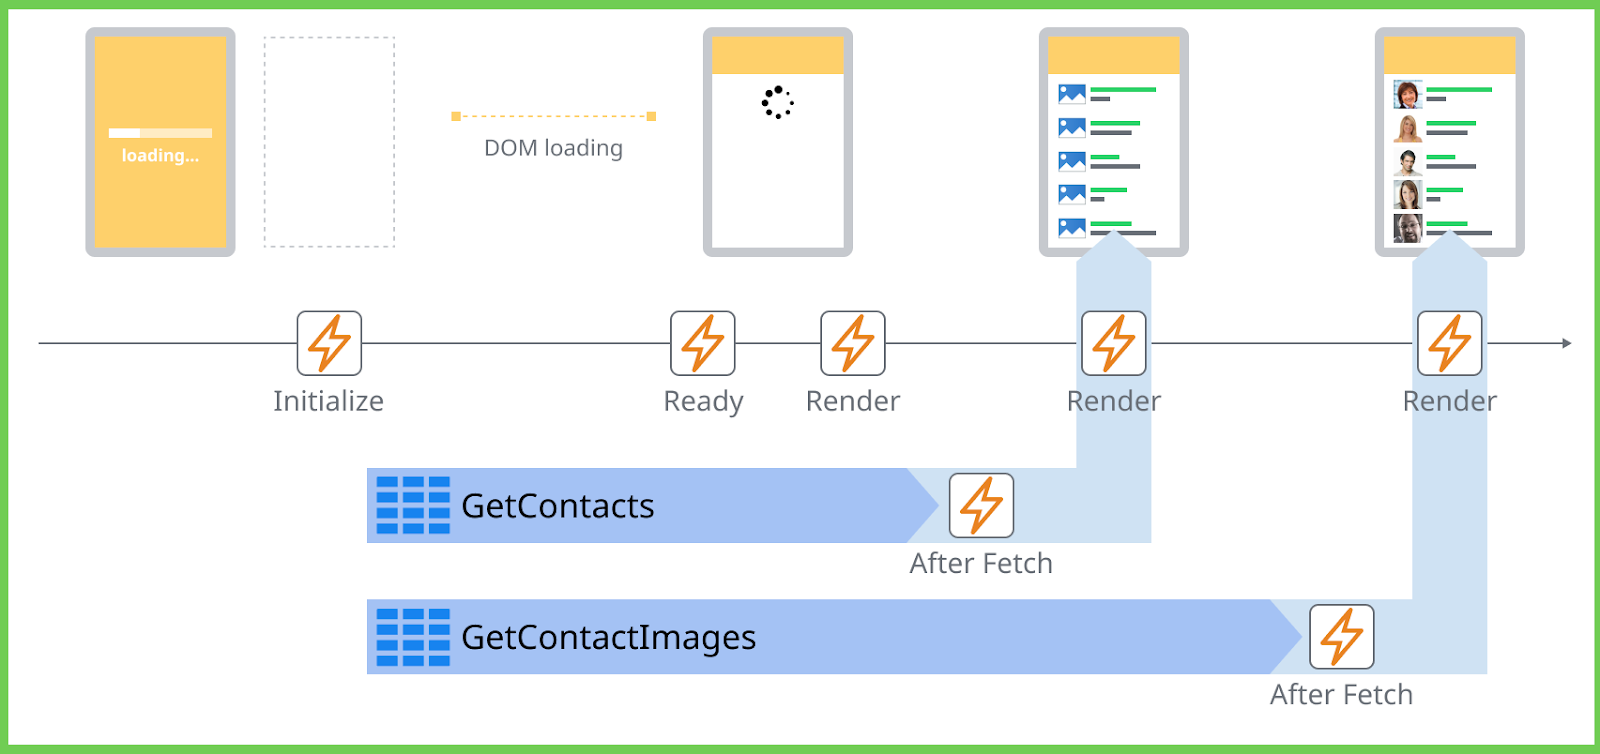
Before going forward, I recommend you watch a short, explanatory video about Screen Lifecycle events illustrated in the image below if you're unfamiliar with how it works on the OutSystems Platform.
#1 – Complex Logic Inside The Events OnInitialize Or OnReady
Best Practices recommend never adding all the preparation logic to an OnInitialize or OnReady Screen event handler, considering that it causes long delays in rendering the information on the screen. Remember, the Initialize event is responsible for requesting the screen DOM and fetching all the data, defined with the Fetch property marked as At Start. So, the screen will wait for this action to be complete before navigating to your destination screen and rendering it. Let’s use the example below.

We’ll use as an example an HR Portal and its Dashboard page with a link allowing a Manager to navigate to the People screen and consult the list of employees on it. Now, let’s analyze the action above. The main goal is to fetch the data related to the company’s employees (People) only if the company has departments to place those employees. Recapping the Screen lifecycle events, the transaction between the screens only happens on a browser after the events Initialize, Ready, and Render of the destination screen finish its execution. Doing the hefty logic above inside the On Initialize Event, the HR Manager will be stuck inside the Dashboard screen until the events finish processing their logic. However, when you want to fetch data from the database based on a specific condition of another query, the best approach is to work with the Fetch property and the After Fetch event of the queries. See the example solution below.
Add both aggregates to the screen, but change the respective Fetch properties.
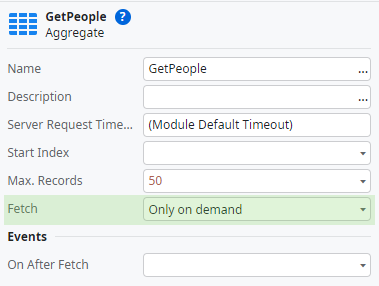
The GetPeople aggregate should only be executed after we ensure that GetDepartments aggregate returns at least one department. Thus, it will not be necessary to fetch this aggregate on the Initialize of the screen, so we can change the Fetch property of it to Only on Demand, improving the performance of our application.
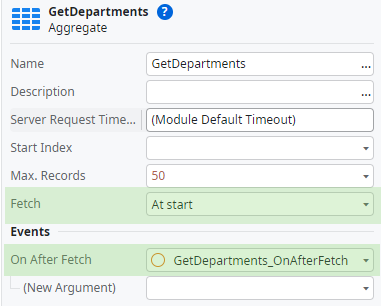
To validate if the GetDepartments aggregate is returning any department, we can add a new action on the On After Fetch event of that aggregate and check if the respective list is empty or not (GetDepartment_OnAfterFetch action).
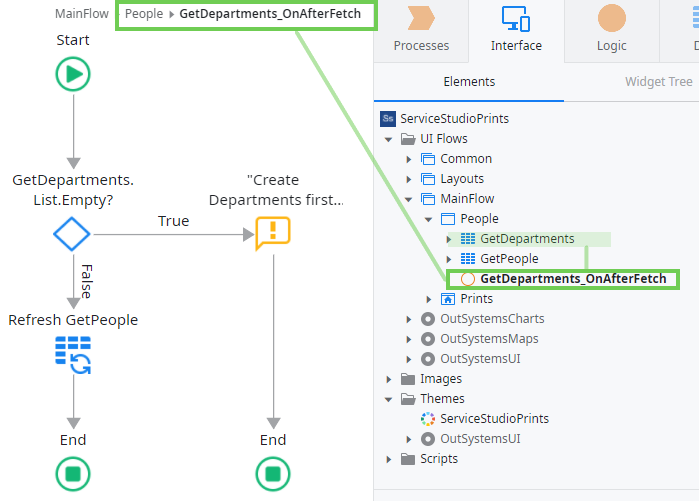
Now, inside the GetDepartment_OnAfterFetch action, we can validate whether the GetDepartments aggregate is empty. If it is, we return a message to the UI giving back that feedback to the Manager. Otherwise, we can request the GetPeople aggregate using a Data Refresh tool. The data will be returned, once again asynchronously, to the UI, which will later render the respective widgets responsible for displaying it.
This approach simplifies the Initialize logic, executing the first three events more efficiently, and the transaction between screens will be swift.
#2 – Refresh Data With The On Render Event
As we saw above, it is possible to request a refresh of a query. But what happens when we do it inside the Render Event?
The Render Event handler will be executed each time this screen is rendered, i.e., once the screen completes the render of the Widgets and after any data changes in the screen. If you use it to request the data, once the data is fetched and rendered on the screen, the handler will run again, and consequently, the aggregate will also run once again. Using this approach will create an infinite loop, and the platform will even warn you about it. Still, it will not stop you from publishing your code.
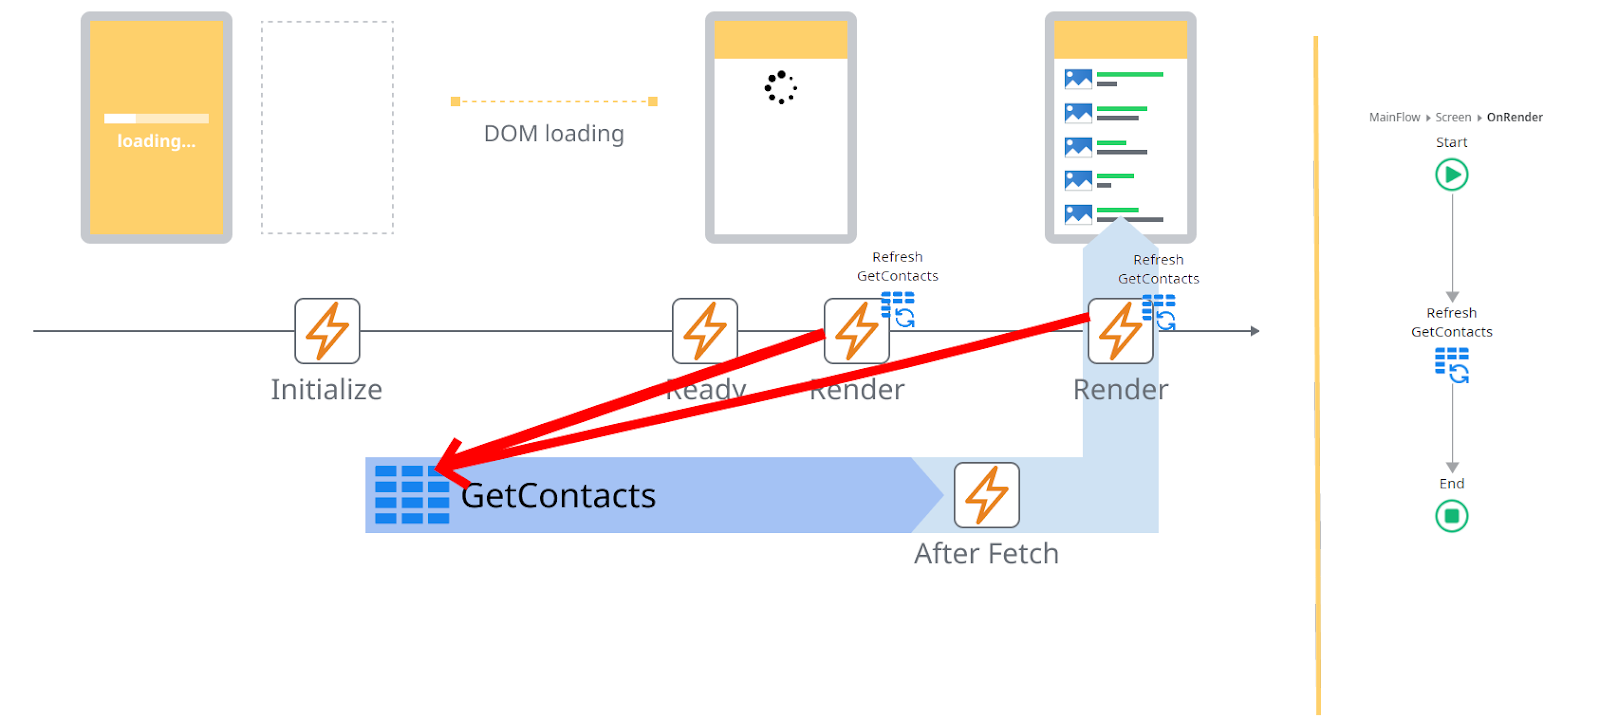
The GetContacts aggregate is being requested At Start by the Initialize Event. Inside the Render Event, the Data Refresh tool again requests the aggregate. This will generate an infinite loop, and you will see a warning on the Service Studio TrueChange similar to the following:
“Potential Loop at runtime
'OnRender' changes the Screen data, which triggers the on render event again. To avoid infinite rendering loops, don't change screen or block data in 'OnRender'.”
I'm yet to find a good example of why you would want to refresh data inside this specific event handler. However, if you absolutely need to do it, at least use a local variable with a condition to break your loop, something like after one request.
#3 – Dependencies Between Aggregates
Recap
No matter how many Aggregates and Data Actions you add to a screen, if all of them have the Fetch property set to At Start, they will execute simultaneously, parallel and asynchronous. Thus, it is impossible to guarantee that one particular query will return results before another. Consequently, a given result can't be used to filter another query on the Screen.
First Scenario
An HR Manager wants to associate the city 'Lisbon' with 'Ana Sousa's employee record. Having the Entities City and Country, it's not reasonable to use a single dropdown to display all the world's cities. The list would be virtually endless and cumbersome for any User to go through.
A better solution would be the divide-to-conquer approach. How? First, provide a Country Dropdown list, then based on the selection, fetch the respective cities filtered by the chosen country to populate the other dropdown. Check the sample UI below.
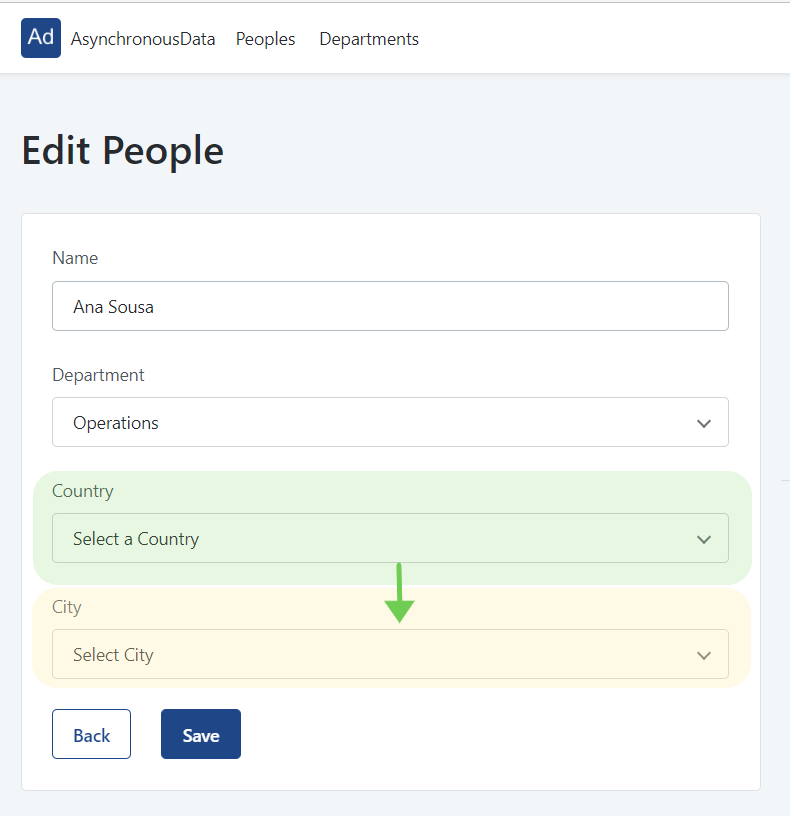
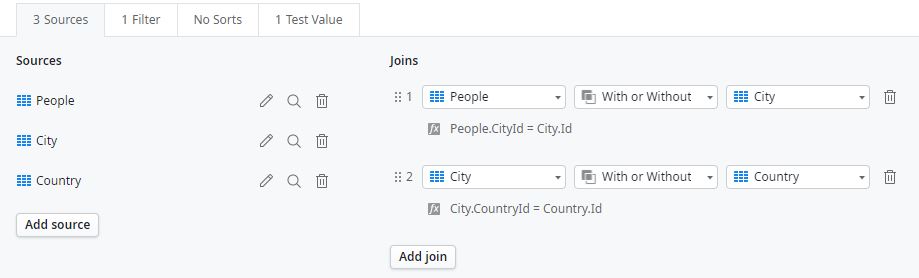
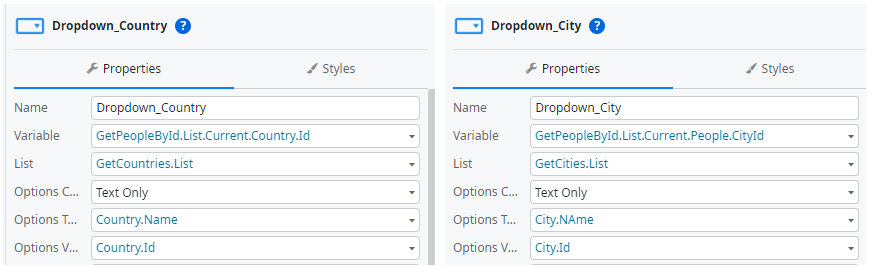
The logic behind this scenario is straightforward. First, the aggregate GetPeopleById used to edit the ‘Ana Sousa’ record should have a JOIN with the Country and City entities. Then, bound the respective identifier attributes to the dropdowns.
This step will allow the Manager to assign the values to the record and later save it on the database and check the values available on the dropdown. If the Manager returns to this screen later, the corresponding values will be immediately requested on the query used to fill in the form.
Nextly, change the GetCities aggregate to filter the cities by the selected country. Also, change the aggregate Fetch property to Only on Demand.
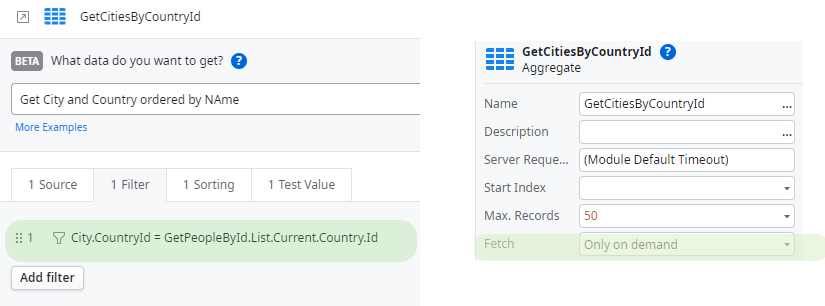
This way, the cities will be fetched only when requested and filtered by the country.
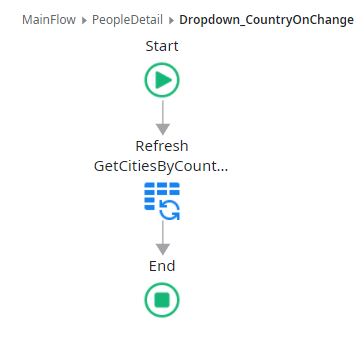
Whenever the Manager selects a different country, the list of cities must be updated. So the last step is to add an OnChange action to the Country dropdown requesting the refresh of the GetCitiesByCountryId.
The solution is almost perfect. Everything necessary to efficiently select the relevant data is done. However, if the Manager returns later to this screen, the cities' dropdown will be empty, and the previous selection will not be displayed. This happens because we defined the GetCitiesByCountryId aggregate to be fetched as Only on Demand. To solve this, on the After Fetch Event of the GetPeopleById aggregate, check if the CityId attribute was previously filled in. If so, add a Data Refresh tool to request the GetCitiesByCountryId aggregate.
Second Scenario
In the first scenario, the city information was fetched through the interaction of the HR Manager with the UI. However, in this second scenario, that interaction no longer exists. Take the Country detail screen displayed below. Its goal is to allow the creation and update of a Country record while showing its respective Cities. Thus, the user's interaction to list cities is no longer required.

A straightforward way to implement the data fetching logic is by applying the previous logic:
- Define the GetCountryById aggregate to At Start.
- Set the Fetch property of the GetCitiesByCountryId aggregate to Only On Demand.
- Refresh the GetCitiesByCountryId aggregate in a new After Fetch action of the GetCountryById aggregate.
- And remember to add the respective filters:
- Filter the GetCountryById by the CountryId input parameter.
- Filter the GetCitiesByCountryId aggregate by the Country.Id (GetCountryById.List.Current.Country.Id) returned by the GetCountryById aggregate.
This approach is simple. However, it creates a performance issue because when using the On After Fetch event handler of aggregates to execute other aggregates in sequence, a new Server request is executed, increasing the pool of requests on the Server-side.
Instead of using this approach, the recommendation is to create a Data Action containing all aggregates in the correct order. This action will execute in the server in a single request.

This way, you fetch all the data displayed on the screen with a single call to the server while respecting the correct fetch order.
#4 – Execute Logic Depending On The Data Refresh Result
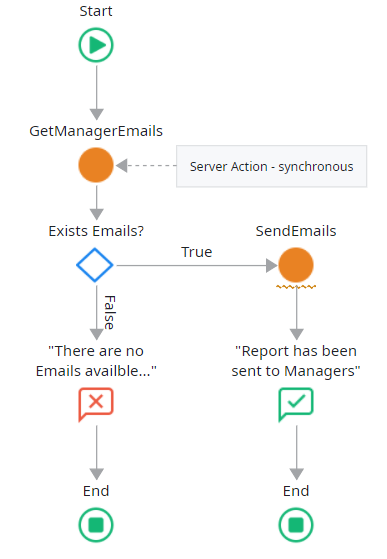
Sometimes we need to execute logic dependent on the result of a query you just requested a refresh. For example, inside a Department detail screen, an HR Manager can send an email to all the Company's Managers, reporting the complete information of the Department, such as names and the list of employees.

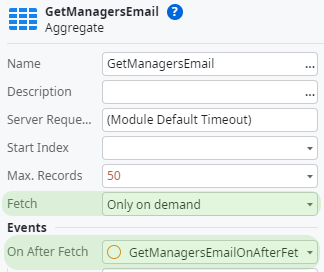
To have all Managers’ email addresses, the screen fetches a new aggregate GetManagersEmail. Since this feature is to be executed only when necessary by clicking the Send Report button, it doesn’t make sense to fetch the GetManagersEmail aggregate at the start of the screen. So its property must be changed to Only on Demand.
Furthermore, a double check was added to the screen to guarantee that an email is sent only if the GetManagersEmail aggregates return at least one Manager with an email address. Otherwise, an error message will be shown to the HR Manager, telling him that it is necessary to associate one valid email at least to one of the Managers. The logic is shown in the picture below.
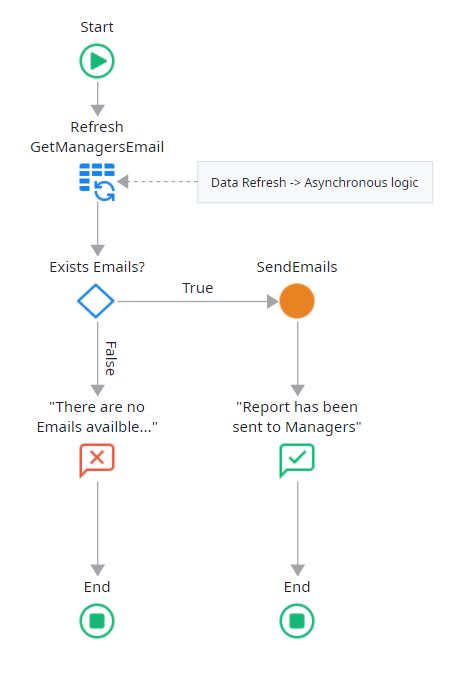
When dealing with a Data Refresh, we must remember that the requested Aggregate or Data Action will be fetched asynchronously. So we can not guarantee that we will have the query results before we go to the next node of the logic, like the IF condition in the image. In this situation, we may provide a feedback message to the HR Manager saying that there were no emails when, in reality, there was just not enough time to process the request.
To solve this problem, we need to guarantee that we check the logic below the Data Refresh only after receiving the data. Thus, all logic after the Data Refresh node should be moved to the After Fetch event handler of the GetManagersEmail aggregate, as in the example below.
The SendReportOnClick action now is only responsible for requesting the emails. And once the data is received, the GetManagersEmailOnAfterFetch action will execute the validation to check if there are any emails, provide the correct feedback to the HR Manager, and send or not the emails to the Managers.
There is an alternative solution, instead of using an aggregate directly in the screen to fetch the emails, you can fetch it using a Server Action directly on the SendReportOnClick action.
However, on the one hand, you are simplifying the logic, considering that a Server Action is called synchronously. On the other hand, you are creating a different performance issue for the current scenario. Now, instead of one single call to the Server, your action is doing two separate calls inside the same flow. So even if this solution might be helpful, be careful not to go against another Best Practice. Essentially, use only this approach if your Server action to fetch the data is the only one inside the current flow.
#5 – Fetch all data even if not necessary
This scenario is easy to understand after the previous example: we just want the Managers’ Emails to aggregate once the user clicks on a specific button, not at the screen’s loading. Essentially, sometimes there are some Aggregates or Data Actions on a screen that are not needed or displayed the first time a user visits the screen. Considering this, we should change the Fetch property to Only on Demand and add an extra step to execute the queries only when the user needs them, which will avoid unnecessary requests to the server.
#6 – Fetch data depending on a specific role
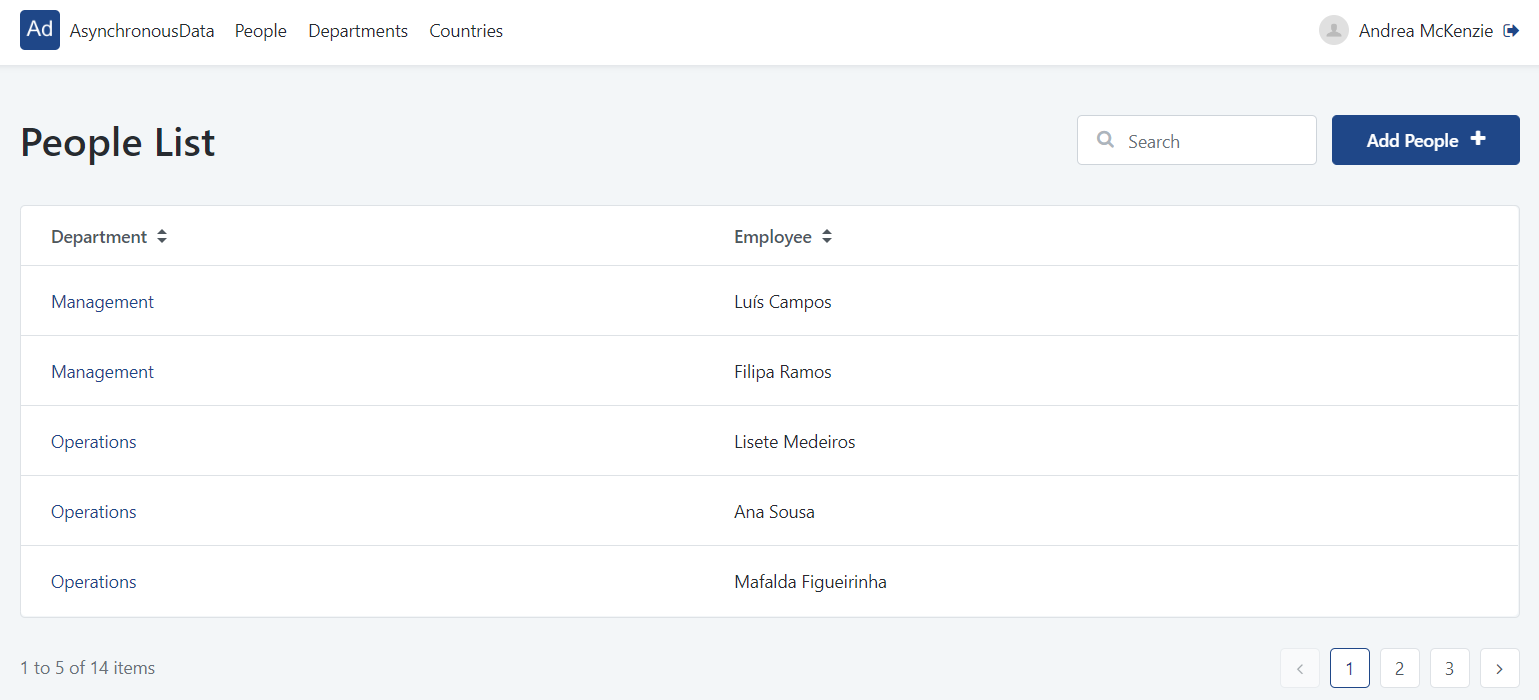
Finally, the last scenario happens when you need to display different data depending on a specific user Role. Using the People screen below, which shows all the company’s employees, all employees must be listed if the user is an HR Manager. Otherwise, only his own data would be visible.
When confronted with a scenario like this, we can use one of the following approaches:
- If the data belongs to different scopes, then it is better to create different screens.
- If the scope is the same, but we want to apply a condition filter, like listing all or just a few, a dynamic filter can be added directly to the query.
However, suppose the data comes from different aggregates, and you want to fetch one or the other depending on the user's Role. In that case, you can use the Initialize Event to check if the user has the role or not (on Client-Side), plus the Refresh Data to request the specific aggregate based on the Role, and change the Fetch property of both aggregates to Only on Demand.
Dynamic Filter Scenario
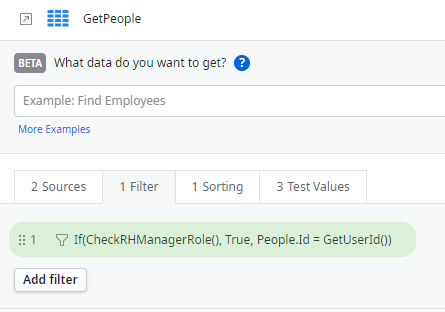
The filter will check if the current user is in the HR Manager role, and if so will display all the records (where clause will be WHERE TRUE), otherwise will filter the list of the records by the primary key of the current user (in this case, the where clause will be WHERE People.Id = GetUserId() ).
On Initialize Scenario
Defining both aggregates as Only On Demand, and having two different widgets to display the results, will allow fetching each aggregate only when it makes sense.
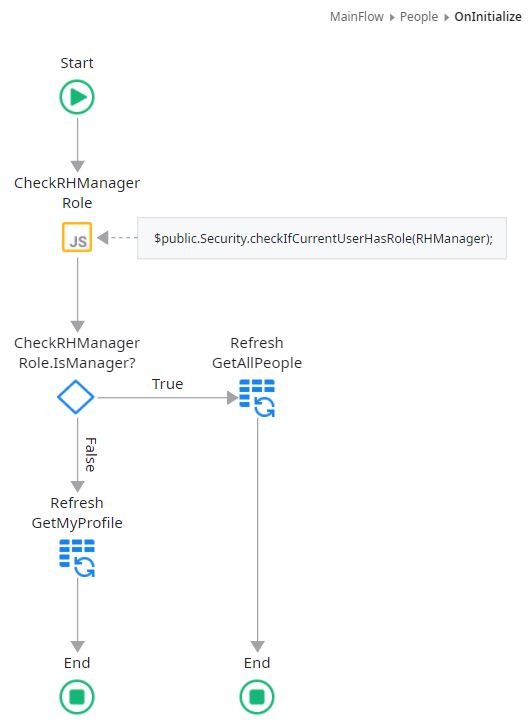
In the On Initialize event handler, you can use a JavaScript node on the client side to check if the current user has or does not have the HR Manager role. If the JavaScript returns True, the aggregate GetAllPeople fetching all the data can be requested. Otherwise, only the GetMyProfile aggregate, being used to display the current user's information, will be requested. Implementing this strategy avoids executing both queries, considering only one is needed.
What next?
Is it your first time looking into OutSystems?
Check our courses, Turn Up Boot camp, or Reactive Developer on ITUp’s Website. The first course is for you if you are thinking of a career shift into the tech or OutSystems world. The latter is if you are just interested in achieving the basic skills to create your own Reactive apps. Both courses include the certification voucher for the exam Associate Reactive Web Development.
Conclusions
Now, you don’t have excuses to let your users see white screens or loading timers while waiting for the data to be fetched. Remember that fetching data on Screens inside Reactive applications is done asynchronously, as well as its Data Refresh. Try every time that it is possible to follow the Best Practices, but keep in mind that following one of the Best Practices must not invalidate another one.
Furthermore, consider that each scenario is different, and a Best Practice is just part of a guideline book of recommendations, not a mandatory Rule for you to follow. Identify the possible solutions and use the most adequate for your projects and scenarios.
Now that you have seen some of the Best Practices related to OutSystems Asynchronous Data, I highly recommend you further your education. But you are not alone in your journey to achieve advanced knowledge: start by exploring other Best Practices recommendations with the support of excellent documentation, courses, and the OutSystems Community. Plus, consider improving your skills by learning to troubleshoot your code through the Debugging mechanisms and the Service Center platform.


