
Emails
In the world of modern applications, connectivity is vital. Applications today are not just for individual use; they play a crucial role in facilitating communication. This is where the OutSystems Platform comes in. It offers robust capabilities to extend your application's reach through effective email communication.
This article will guide you through the steps to configure and send emails using OutSystems 11, demonstrating how your applications can efficiently connect with users and stakeholders.
Quick note: the examples in this article were developed in an OutSystems Web Reactive application using the Service Studio version 11.8.12. If you would like to know more about the OutSystems Platform and Service Studio developer tool, please follow the links:
Get Ready
To start, configure your mail server connection at the Service Center portal. Using Gmail as an example, let’s check the needed data. But before going ahead, if you are unfamiliar with creating an STMP on Gmail, please check this article: Gmail SMTP Settings: Easy Step-by-Step Setup Guide.
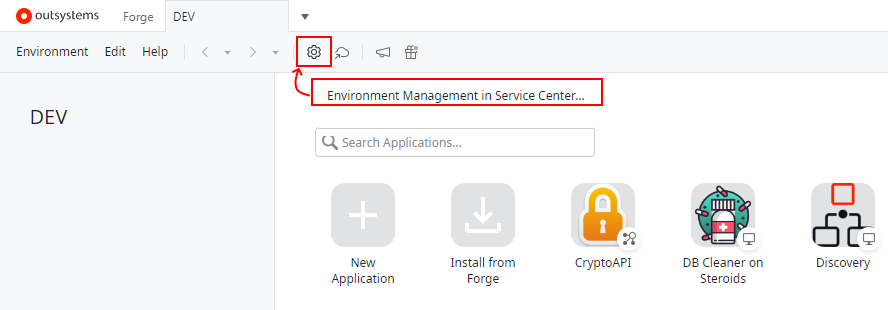
First, go to the Service Center portal using your environment domain, followed by “/ServiceCenter” on the browser. Alternatively, you can open the direct connection using your Service Studio, as displayed in the image below. Your credentials will be the same as those you use as a developer on Service Studio.
Inside the Service Center portal, go to the menu Administration and select the tab Email. The Email Configuration page will be displayed. Fill in all the data necessary to configure your SMTP (Simple Mail Transfer Protocol). In image 2: Email Configuration, you can see a sample of it and the details about each one of the properties.
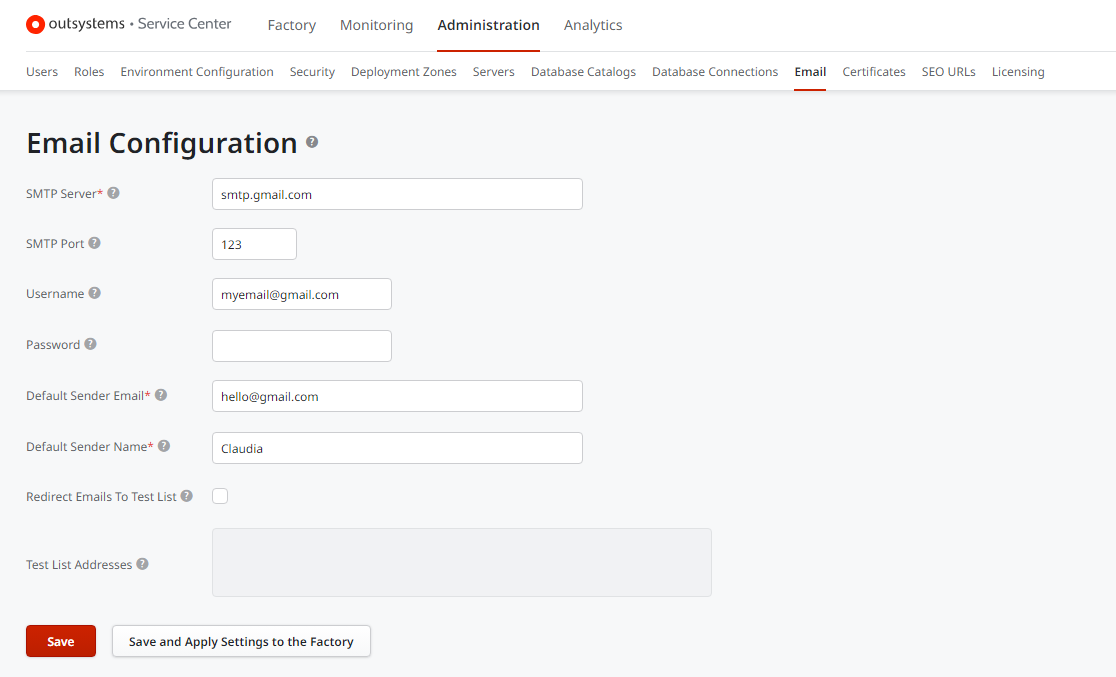
The showcased configuration is based on the Gmail server.
- SMTP Server is the Email server hostname or IP Address, e.g., ‘smtp.gmail.com’;
- SMTP Port refers to the Email server communications port. If no port is defined, port 25 will be used.
- Username and Password should be configured with the person’s credentials, with permission to send emails defined in the STMP Server.
- Default Sender Email will be the default email address used when no sender is specified in the Form property of a scent email, e.g., 'reply@yourcompany.com’. If you select a different email on the Service Studio code, that one will overwrite the one inside the Service Center.
- Default Sender Name, same as the Default Sender Email, you can overwrite in the Service Studio, using the From’s property of a sent Email, e.g., ‘RH Department.’
- If you check the box for Redirect Emails To Test List, the server will redirect all emails to the test list addresses.
- Test List Addresses property is only enabled if the Redirect Emails to Test List checkbox is checked. You should separate each email address using a comma. E.g., ‘internaltest@gmail.com, myemail@gmail.com’.
Send Email Logic
We will now explore the step-by-step logic that allows your Reactive Web Application to send new emails. Are you familiar with creating Reactive Web applications inside the Service Studio? If not, please check the Becoming a Web Developer Guide Path or attend a Reactive Developer Boot Camp classroom training to accomplish the minimum requirements before continuing.

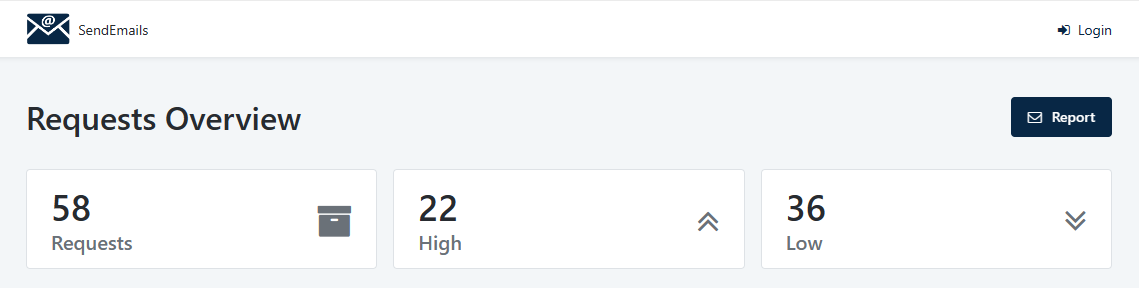
Considering the Dashboard screen above, let’s assume that a Manager wants to email a summary report related to Request counters. We’ll use the button in the top right corner of the screen to execute the logic to send the email.
The first step is understanding that the email logic needs to be executed by the OutSystems Server. The actions on the Screen are Client-side actions (actions that run in the browser), so you must add a Server action to the flow of your Report button action. The Server action will wrap inside all the logic of the email.
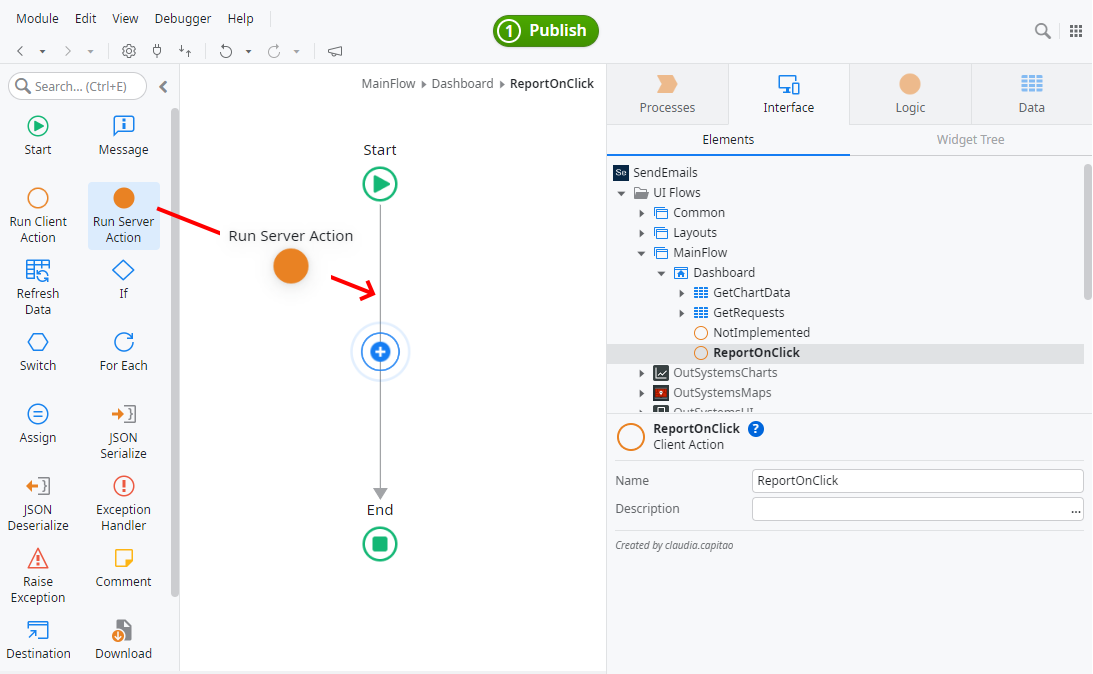
To run a Server Action inside the flow, drag and drop it from the Tools bar, as shown in the image. A new window will be displayed. Select the option New Server Action.
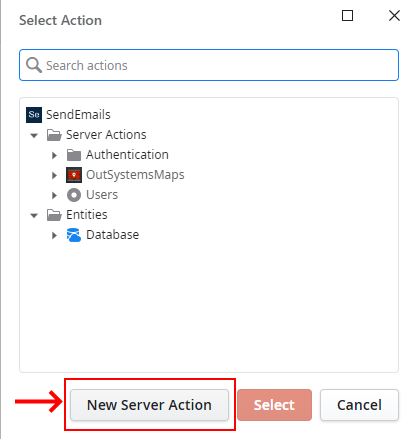
Once you select New Server Action, your flow will present you with the Action1 node. Double-click it to take you to the Action1 flow, where we’ll add the email logic.
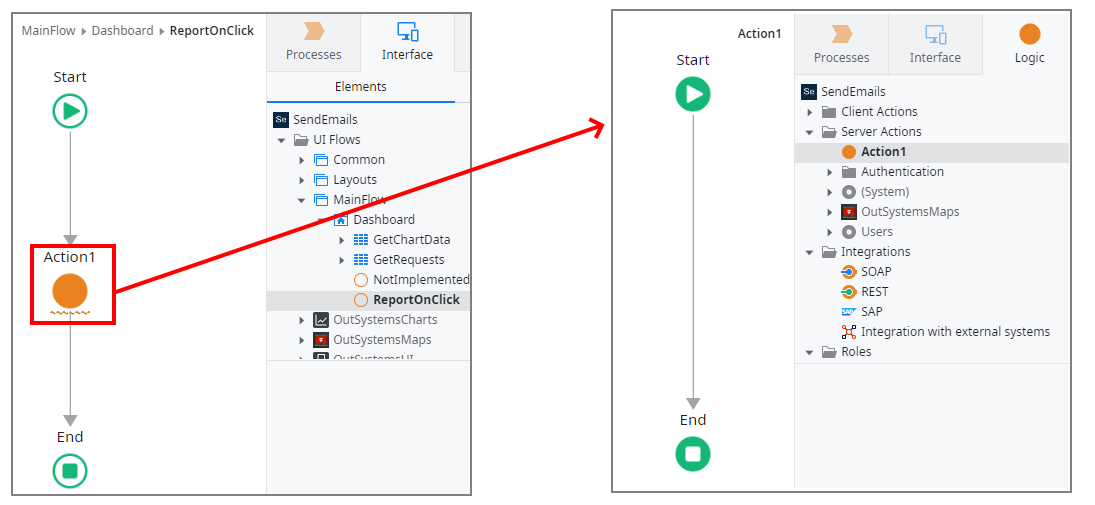
Action1 is available on the Logic layer, while the ReportOnClick action can be located in the Interface layer within the previous screen. According to best practices, you should give your action a meaningful name. Change the name of the Action1 to SendReportEmail and add a description too.
Click on Action1 in the Logic layer and change the respective properties on the properties section available in the bottom right corner of your Service Studio. Once the step is complete, you can add the email logic to the flow.

Drag and drop the Send Email tool to the flow inside the Send Report Email action. The platform will mention some errors related to the Email properties.
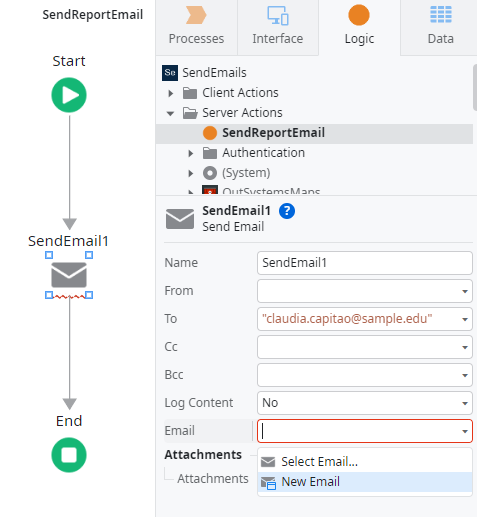
One of the mandatory properties is the email address you need to define to identify the receiver of your email. As a suggestion for your tests, add your personal email on the To property. The other mandatory property is the email content, where you can select existing content or create new content. As this is our first email, we will pick the New Email option within the application. Once this option is selected, a new window will appear.
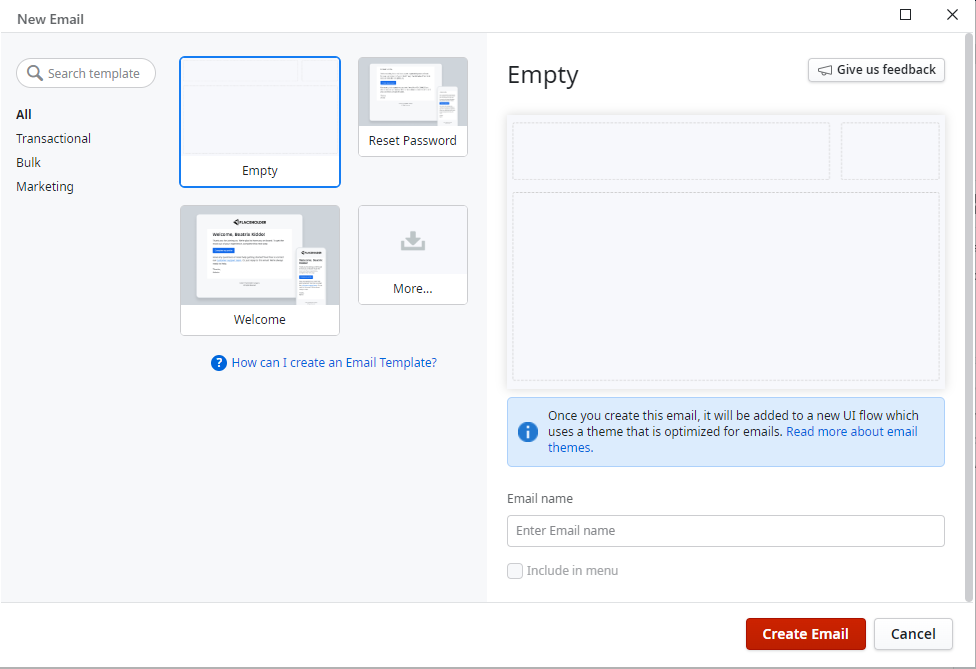
You can choose between an Empty layout or a Template to create a new email structure. We selected the option Empty, considering that none of the other options are similar to the email we want to create. Also, we provide the name ManagerReport to this new UI element. Once this email is created, it will be added to a new UI flow, which uses a different stylesheet optimized for emails. OutSystems uses this approach to reduce the size of your email because it will not attach the base Stylesheets OutSystems UI and Theme to the email. These base stylesheets define your screens’ look and feel, leading to large files.
Note: If you don’t see any email template and want to use an existing one, ensure you have the OutSystems Email Templates installed in your Environment. Go to the Forge, search by “email,” and select OutSystems Email Templates.
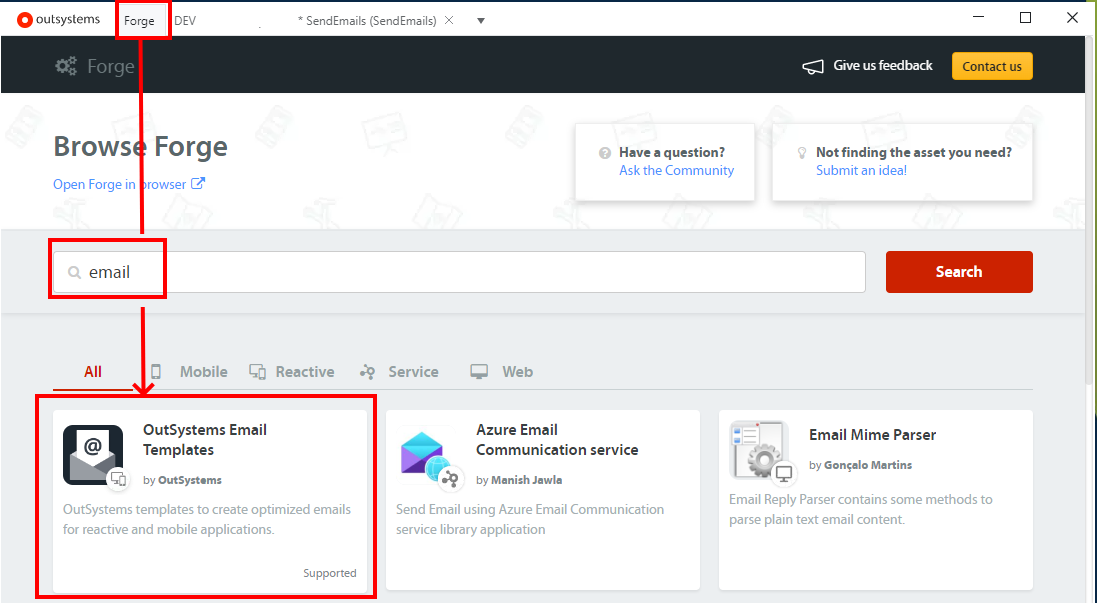
There are other components that you can use, as well. However, we recommend installing the OutSystems Email Templates, considering that they were developed and supported by OutSystems.

As the example in the image above, you can see that ManagerReport is inside the Interface layer, below the Emails UI flow. The first thing you should do is set the Subject property of your email, which will be used as the email’s subject.
You can also create a dynamic subject by adding calculate expressions, such as "Dashboard Report "+currdate(). Once you send the email, this expression will be calculated and display a subject similar to “Dashboard Report 2023-11-14”.

Now, you just need to add the content you want to display. For that, drag and drop the widgets available to the email structure. You can use Containers, for instance, to split your email content into different sections, like the layout below.

This structure uses containers with some CSS styles applied to them. The static name of the Containers was changed to a meaningful name.
Suppose you want to display data, such as a group of counters, to display the total number of requests by different priorities (High, medium, low, and total). In that case, you should add that data as Input Parameters of the ManagerReport email. Then, query the data using the previous Server Action, SendReportEmail.
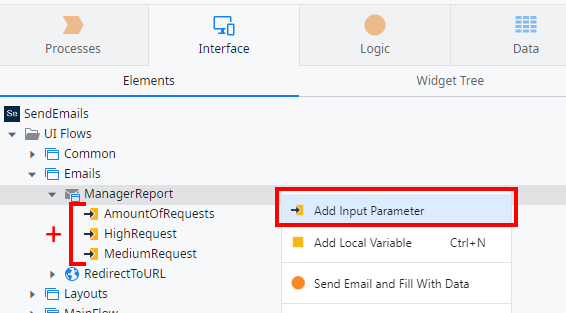
As you can see, we have already added three different inputs. The last input should have the name LowRequest and the data type defined as Integer, the same data type as the previous ones.

When you drag and drop the inputs to the screen, an Expression will be created and calculated when a send email is requested. To solve the errors that the TrueChange displays, go to the server action SendReportEmail flow and fetch counters to the email.
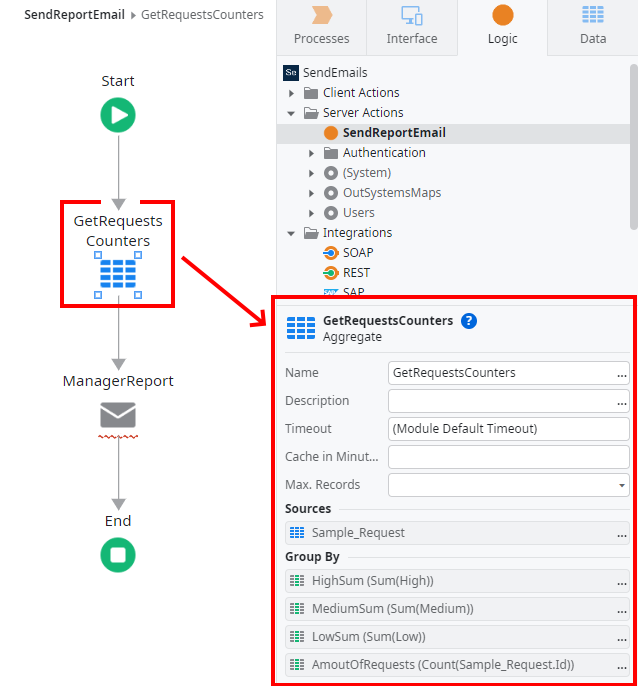
We can use Aggregates or SQL Tool to fetch data from the database. If you are still getting familiar with the aggregates, check that content on the Reactive Guide path or jump to the next step.
Note: The GetRequestsCounters fetches the Sample_Request entity from the OutSystemsSampleDataDB module. Sample_Request entity is the same one used by the Dashboard screen Template. Calculated columns were added inside the query to return if a request belongs to a specific status. Also, aggregation functions, such as Count and SUM, were used to return the counters.
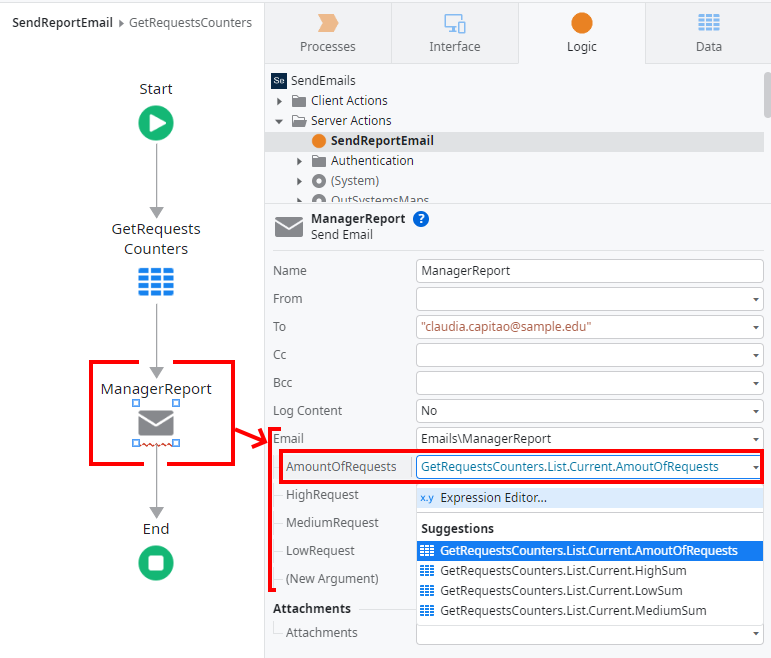
The last step is to bind the values from the aggregate GetRequestsCounters to the inputs available on the ManagerReport node properties. If you are unfamiliar with the aggregates, you can write statics values, such as:
- AmountOfRequests: 50
- HighRequests: 10
- MediumRequests: 25
- LowRequests: 15
Once we complete this step, we will Publish and test the code on the browser.
Clicking the Report button will execute the Email logic asynchronously, so we must wait for the server to send us the email. Give a couple of minutes and check your email box.

The sent email uses the previously created layout, with the cards filled in with the data bound to the input parameters.
What else?
It’s your first time at OutSystems?
Check our courses, Turn Up Boot Camp or Reactive Developer, on the ITUp Website. The first course is for you if you are considering a career shift into the tech or OutSystems world. The second is for you if you want to achieve the basic skills to create your own OutSystems Reactive apps. Both courses include the exam for the Associate Reactive Web Development Certification.
Extra features
I challenge you to explore more advanced scenarios. If you feel stuck in any of these scenarios, explore the OutSystem forum and documentation.
- Send the same email to two different email addresses at the same time. Just change the property To to accomplish this goal.
- Create some new users in your environment with emails. Fetch all the users of your environment using an aggregate. For each one of them, send the same email.
- Add an image as an attachment to your email. Check more documentation here.
- Create a new email layout using an Email Template.
- Monitor the success and explore the email logs inside the Service Center.
Conclusions
In OutSystems Reactive Web Applications, we can configure the Service Center and implement logic in the Service Studio to send emails to our peers or contacts. We use a client-side action bound to a button on a screen to trigger the send email server-side logic. The logic to send the email is placed inside a Server Action. On the Server Action, we add an Email node to create our email’s layout structure and content. To populate the body of the email with data from the database, it’s necessary to add input parameters to the email and map its values in the Email node properties available in the Server Action.
If you want to have some fun, try solving a struggle you feel in your daily routine where an email can be helpful. I created an application that emails me a reminder of my friends’ birthdays one week earlier, and it includes a list of gift recommendations that I save throughout the year based on their taste. Creativity is your limit.


