
In this second part, we will continue using Go compiled to WASM to see how we can read and modify DOM data from within the WASM application. If you have not seen the first part, you should do so before continuing with this one.
How to expose functions from within WASM?
We will extend our first program to expose a function from WASM to JavaScript. This function reads data from the DOM and calculates the sum of two numbers. In the following code, we add the connection in JavaScript to a WASM function to give us the ability to call our WASM function from within JavaScript.
To do this, we use the js.Global() bridge connection to set a variable named wasmAddNumbers on the JavaScript side as a function wrapper for our AddNumbers function. We do this by calling js.Global().Set("wasmAddNumbers", js.FuncOf(AddNumbers)).
Then, to keep the WASM code alive, we add select {}
For the AddNumbers function, we parse the inputs of elements A and B into local integers.
We calculate the output string C as the sum of A and B, and finally we set the result in the DOM at the C element.
Since we are using the ParseInt function and the Sprintf function, we need to import the fmt and strconv packages into the go source.
package main
import (
"fmt"
"strconv"
"syscall/js"
)
func main() {
// This is the Hello World message
js.Global().Get("document").Call("getElementById", "T").Set("innerHTML", "Hello World from WASM!")
// Launch the Action Caller Handler
js.Global().Set("wasmAddNumbers", js.FuncOf(AddNumbers))
// Let's keep the app alive
select {}
}
// This is a standard JavaScript wrapper function.
// The arguments are not being used because we call the DOM directly from the Bridge.
func AddNumbers(this js.Value, args []js.Value) interface{} { // This is a the DOM global handler
doc := js.Global().Get("document")
// Let’s initialise a and b with the Respective values from the DOM
a, _ := strconv.ParseInt(doc.Call("getElementById", "A").Get("value").String(), 10, 0)
b, _ := strconv.ParseInt(doc.Call("getElementById", "B").Get("value").String(), 10, 0)
// Lets create a string output with the sum
c := fmt.Sprintf("%d", a+b)
// Finally we set the DOM element with the calculated result doc.Call("getElementById", "C").Set("innerHTML", c) // Just end the call
return js.Undefined()
}
After saving the hello-world.go file we compile again by running the following command:
$ GOARCH=wasm GOOS=js go build -o app.bin hello-world.go
Changes in the OutSystems Module
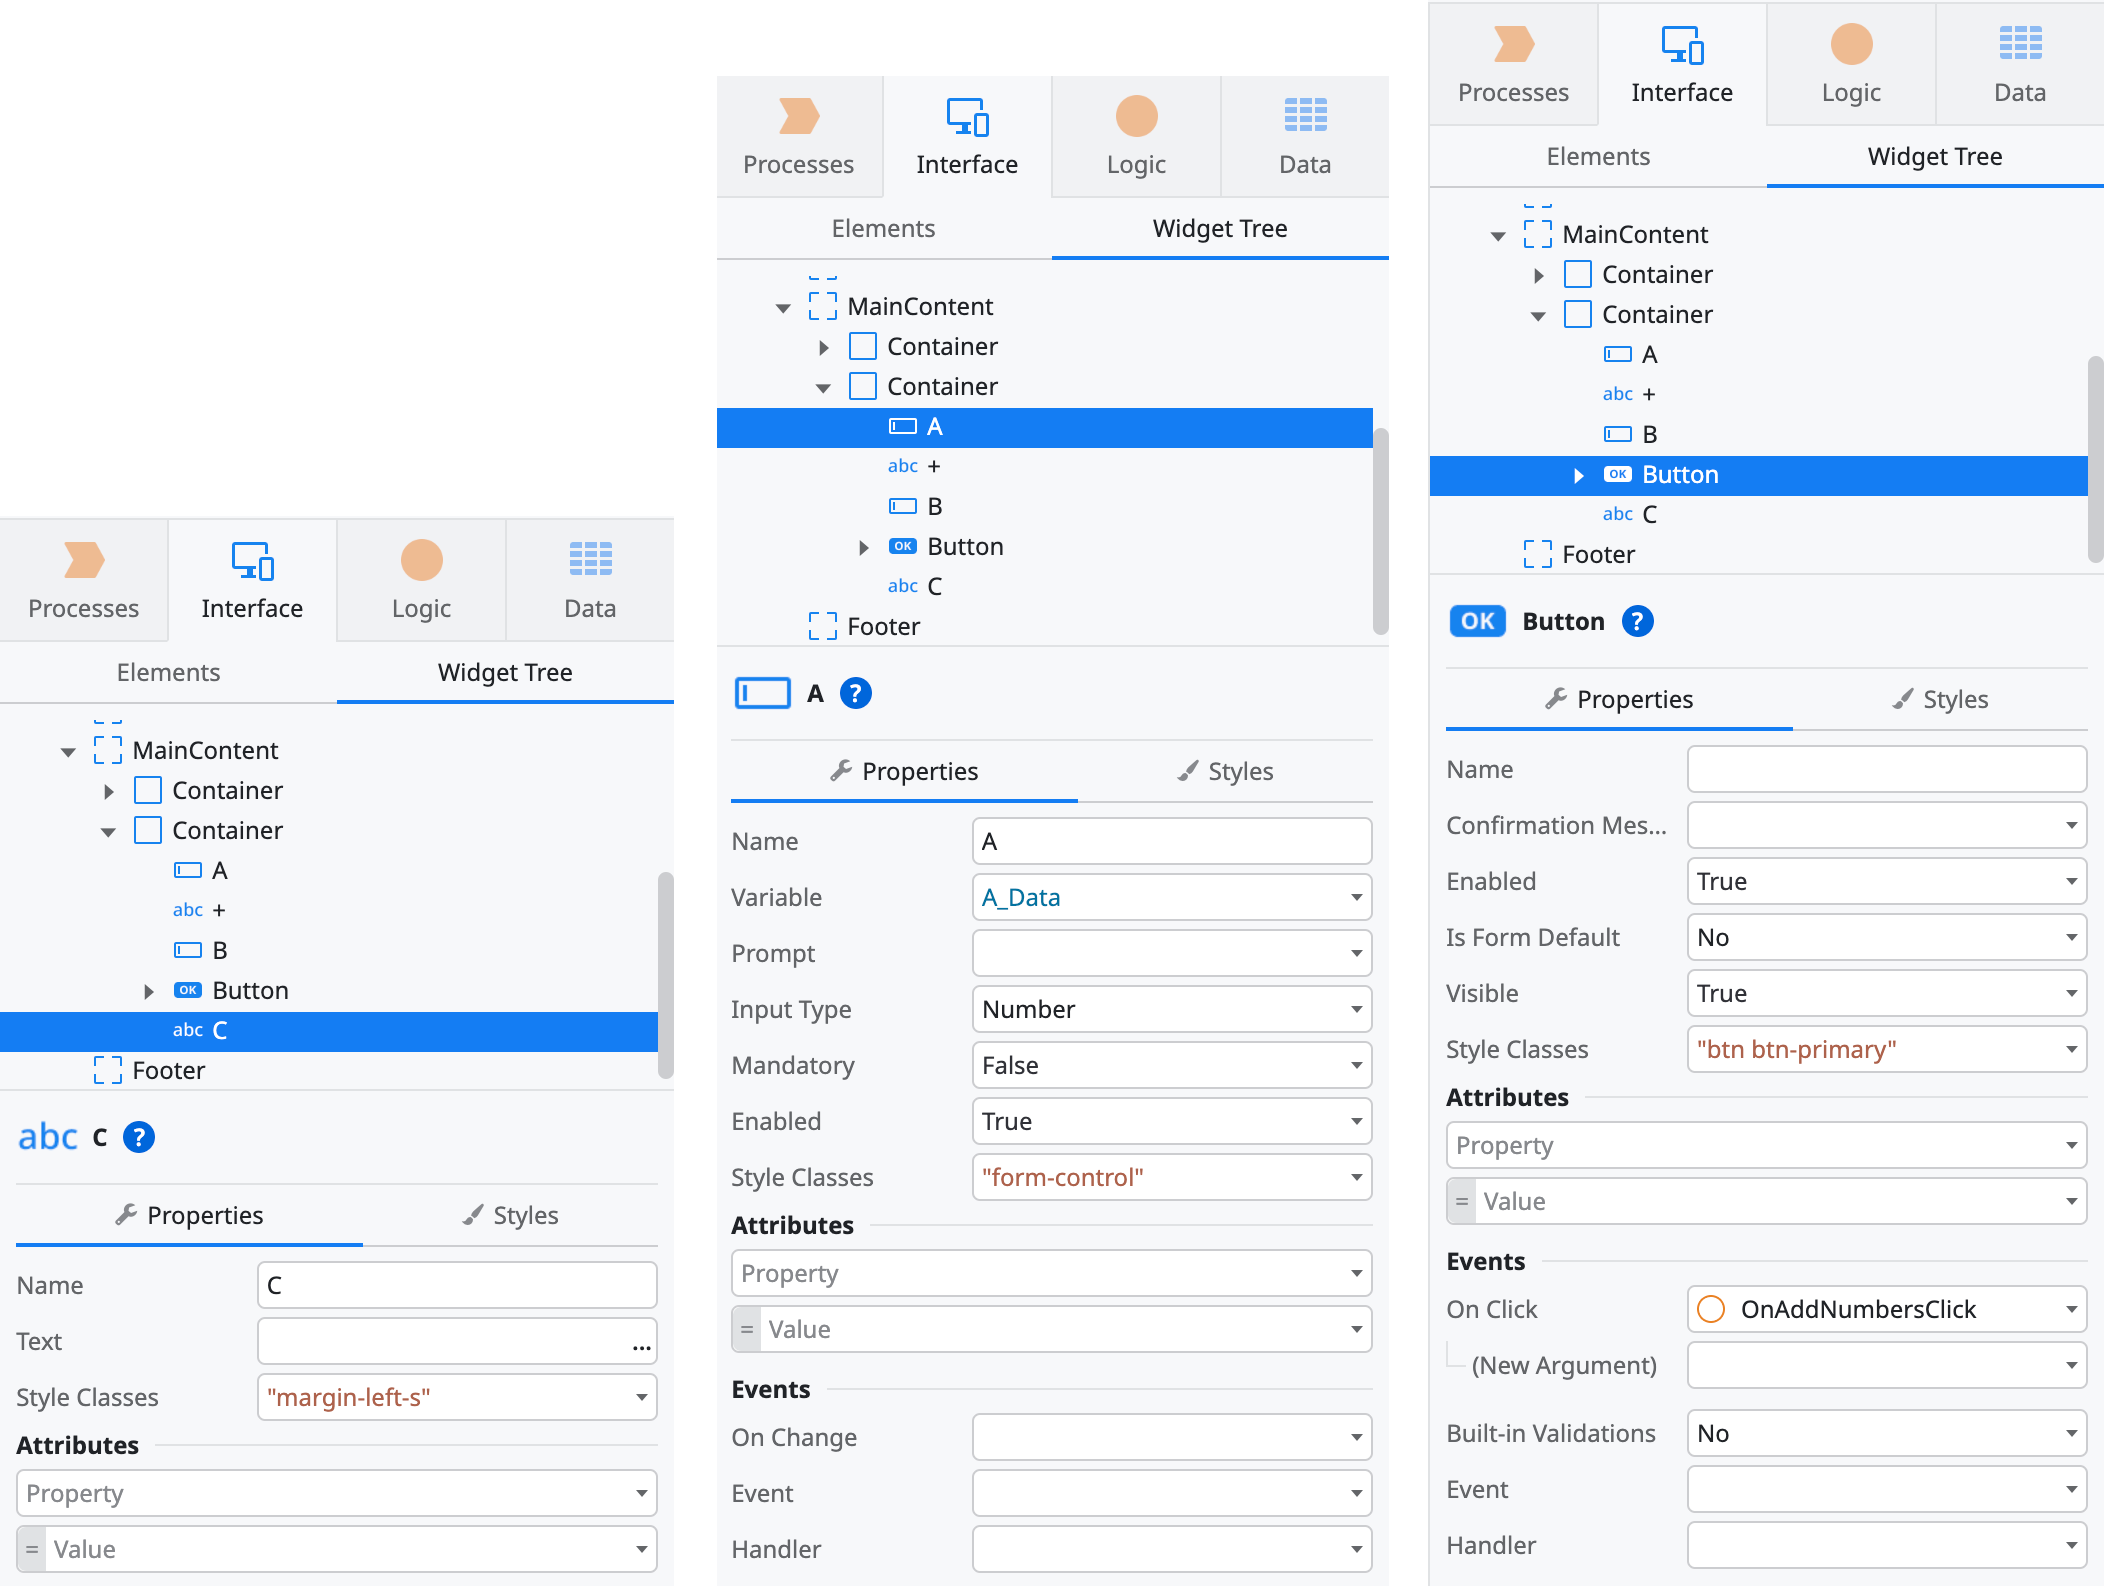
In the HomePage screen, that we have created on part 1, we add two local variables, A_Data and B_Data, both of Data Type Integer.

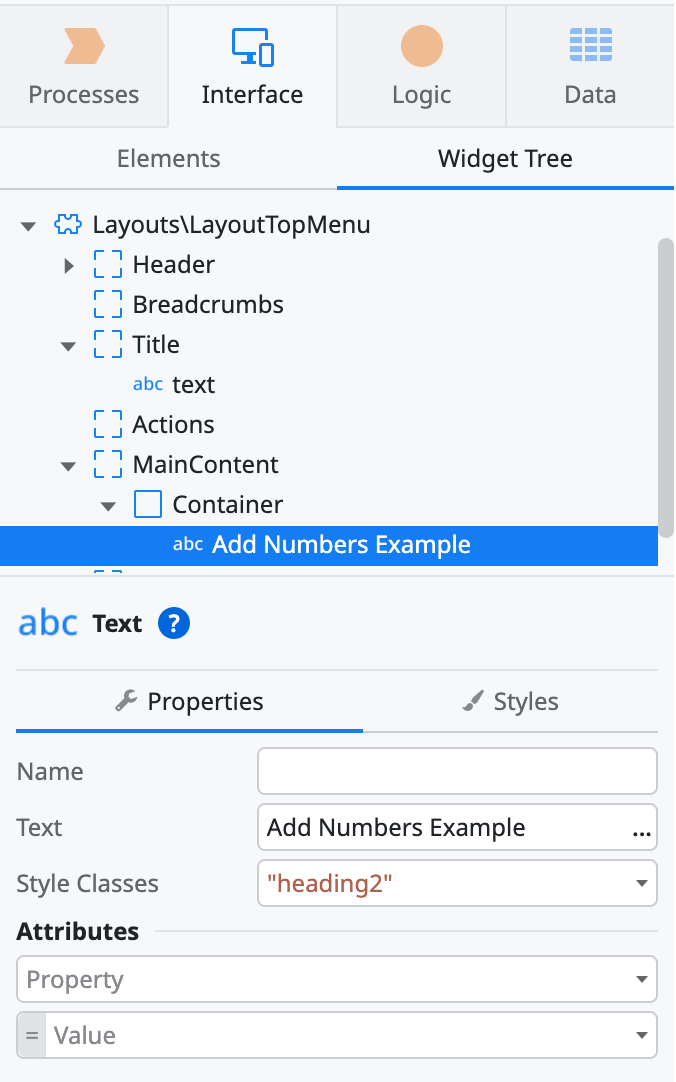
In the MainContent of the screen, we add a container with a Text widget inside it.
In the Text widget, we set the Text property to "Add Numbers Example", and on the Style classes we set "heading2".
For the Container, we add "margin-bottom-m" to the Style class to force a bottom margin and give the input a nicer implementation.
Now we add another container, and inside it we add an input widget, we name it A, link it to the A_Data variable, and set the width in the styles window to "2 col".
After this widget, we add a Text widget with "+" as its Text property.
Then another Input widget named B and linked to the B_Data as we did for the A_Data, also with a width of "2 col".
After that we add a Button with "=" as its Text property and we create an OnAddNumbersClick action as its On Click Event property.
Finally, we add a text named C with "margin-left-s" in the style classes. This will receive the response calculated by the WASM function, so we will clear its Text property.
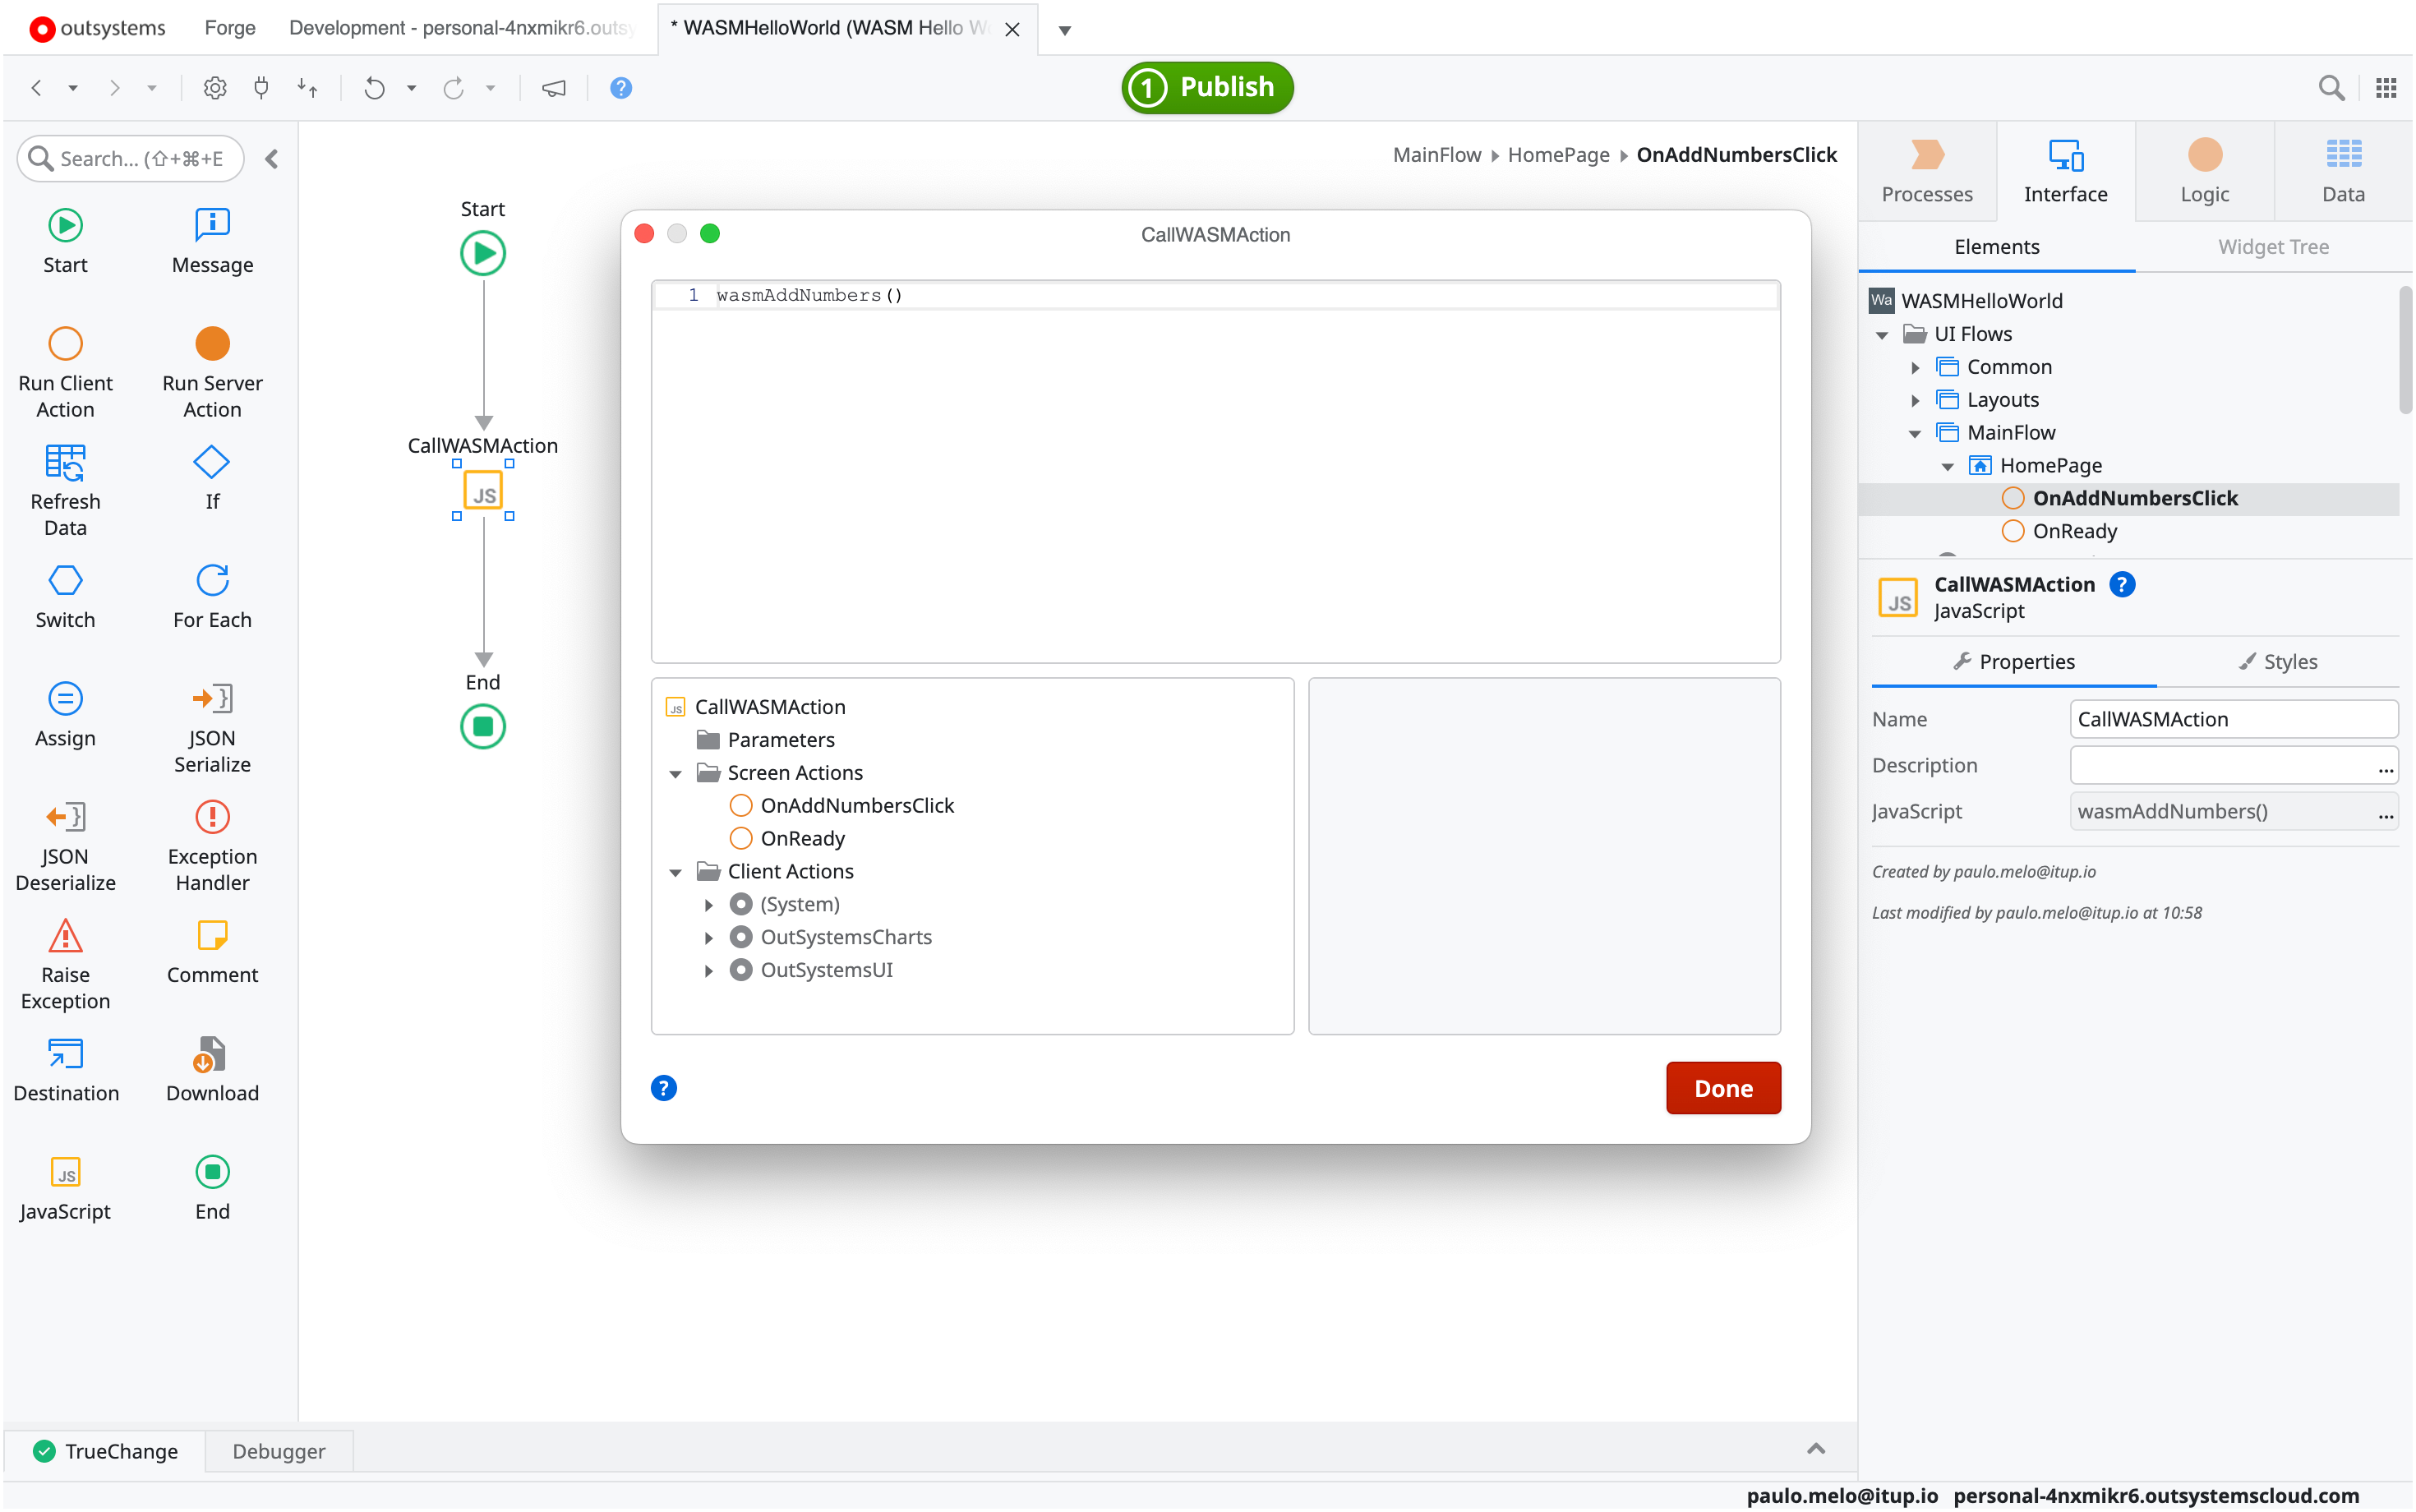
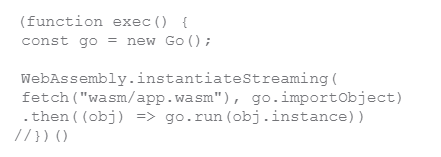
So we open the OnAddNumbersClick action and add a JavaScript node. We name the node CallWASMAction and add the following code inside:
wasmAddNumbers()
It will look like this:
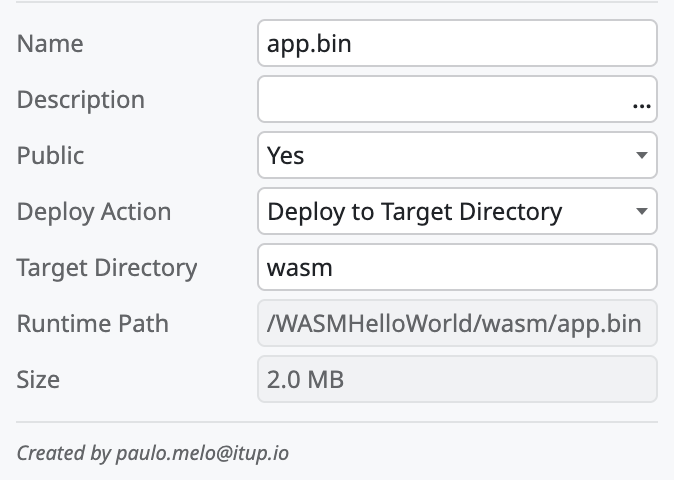
To finish this, we use Change Resource on the app.bin resource in Part 1, with the one we recompiled at the at the beginning of this article.
Finally just Publish and Open in the Browser.
Conclusion
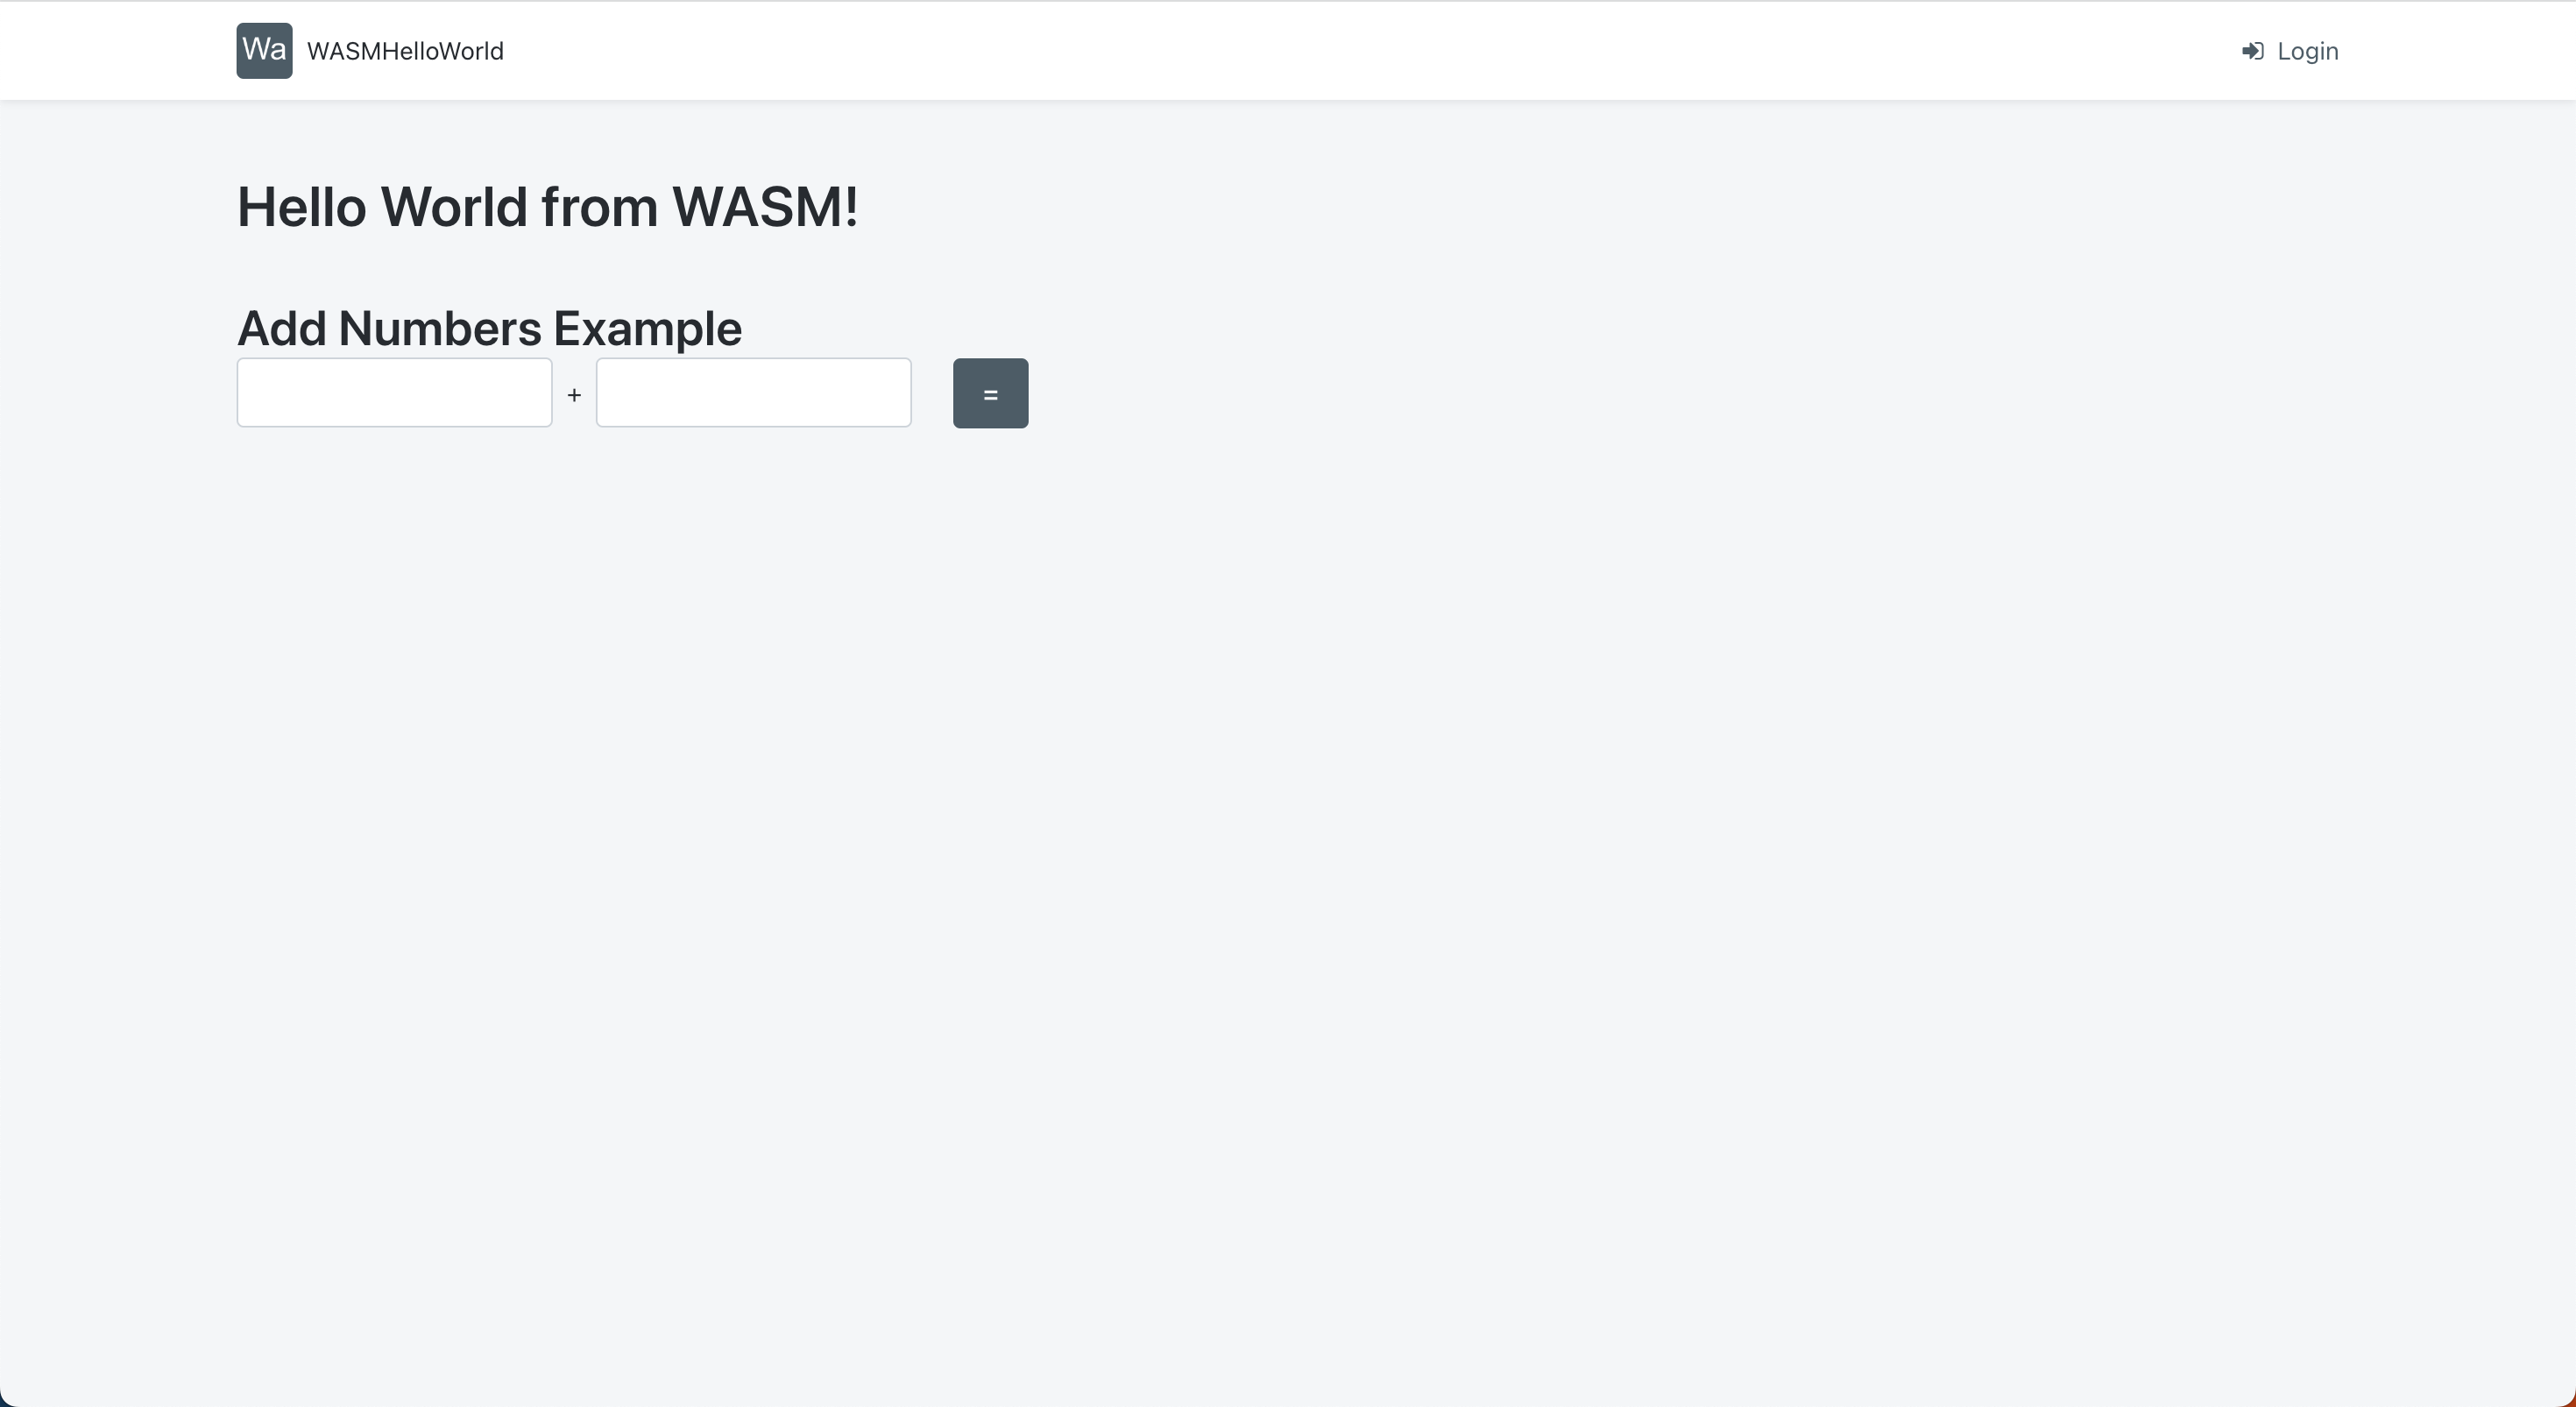
The WASM file has been loaded and instantiated on the page, and the DOM element for the title has been modified by the WASM application as created in Part 1. The form is now visible and we can add values. Pressing the Equals button will execute the action and display the result.
This example could have been done entirely in OutSystems and it would work the same. The idea behind this two part article is that if we need some extra power or capabilities, we can use WASM to send data to the DOM (part 1 and 2) and we can call WASM functions from JavaScript that can read the DOM and do all the necessary calculations (part 2).
Why WASM? Well, it is a compilable language, like C++ or Rust, but with its clean syntax and performance it is a good example of what can be used as a WASM implementation without having a huge overload.
Why compile to .bin instead of .wasm? This is a workaround for personal OutSystems environments. Some of these environments do not have the application/wasm mime type on the web server (IIS), so the only way to submit the WASM application is to use bin. If the wasm mime type is available, we can use the following code on the OnReady JavaScript node.
This code is the correct way to load a WASM application, but it requires that the fetch receive the application/wasm mime type. Otherwise, what we did before is sufficient.
References
From OutSystems:
https://www.outsystems.com/blog/posts/how-to-build-an-app/
The Go Language:
WASM:


