
Learn how to use a federated identity provider (like the Google Identity Platform) in OutSystems Reactive Web or Mobile apps
It’s always a drag to remember all those usernames and passwords for web sites and applications we may not even use regularly. Many users would prefer not having to go through registration and/or logging-in for their applications, and simply relying on a trusted service they already use to streamline the process… enter Federated Single Sign-On and Identity Providers.
Federated Single Sign-On
Most of us use one or more social networking services like Facebook, or use Google services on our devices or maybe own Apple devices and already trust those companies with (some of) our personal details. Others live in countries that have setup national identity providers like Singapore with its NDI {api} strategy and Portugal with the Autenticação.Gov service. And some work in contexts where their organizations use any of these or other comercial options like Okta or Microsoft’s AD FS or Azure AD, to provide their members with an identity.
So at the end of the day, allowing the user to login and/or register using one of these identity providers helps remove friction when interacting with our applications and makes our users’ lives easier (imagine having to login only once for all of your enterprise applications, email and cloud storage 😍).
Traditional Authentication flow
In traditional web applications, integrating these Federated Single Sign-On services typically follows a common flow (with small variations depending on service provider and implementation used) that relies on the server-side nature of traditional web interactions:
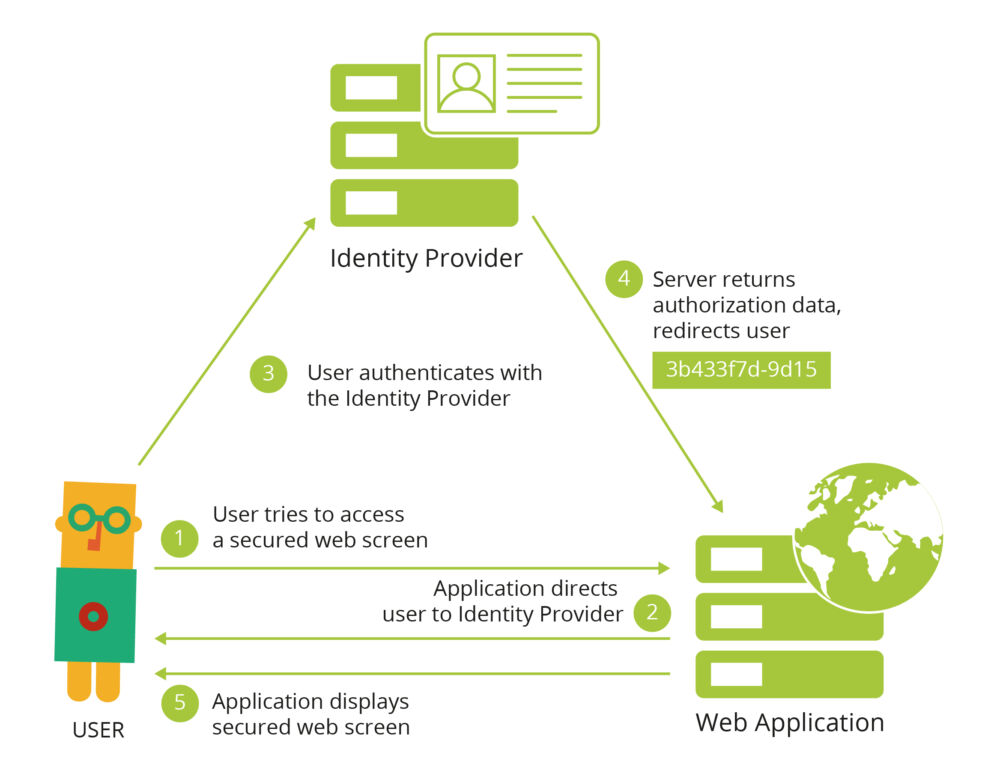
Federated Single Sign-On traditional flow
- The user tries to access an application’s secured web screen without being authenticated;
- The application redirects the user to the identity provider’s page (the user can check the browser details to confirm the authenticity of the login page);
- The user logs-in with the trusted identity provider and;
- The identity provider redirects to a pre-configured callback web screen on the application, passing it the agreed user details;
- The application handles local authentication (setting up a user session, doing any provisioning needed) and shows the user the secured web screen initially requested.
However, this flow doesn’t work as well for modern web applications, were often the user interaction is implemented client-side, possibly without involving the server altogether (looking at you JavaScript frameworks!).
Single-Page Applications Authentication flow
Modern web applications are often Single-Page Applications (SPA) that leverage JavaScript frameworks for client-side logic and rendering of screens while still relying on server-side complex business logic and integrations.
This difference in programming model comes with a few changes in how they can integrate Federated Single Sign-On services, as application screens are now built via DOM manipulation in JavaScript.
In this new world, the application itself would initiate the interaction with the Identity Provider and upon successful authentication will also receive what is commonly referred to as an identity token that it can pass to the server in case there is a need for integration with the Identity Provider server-side.
So in this new world of SPAs, what would the authentication flow look like?
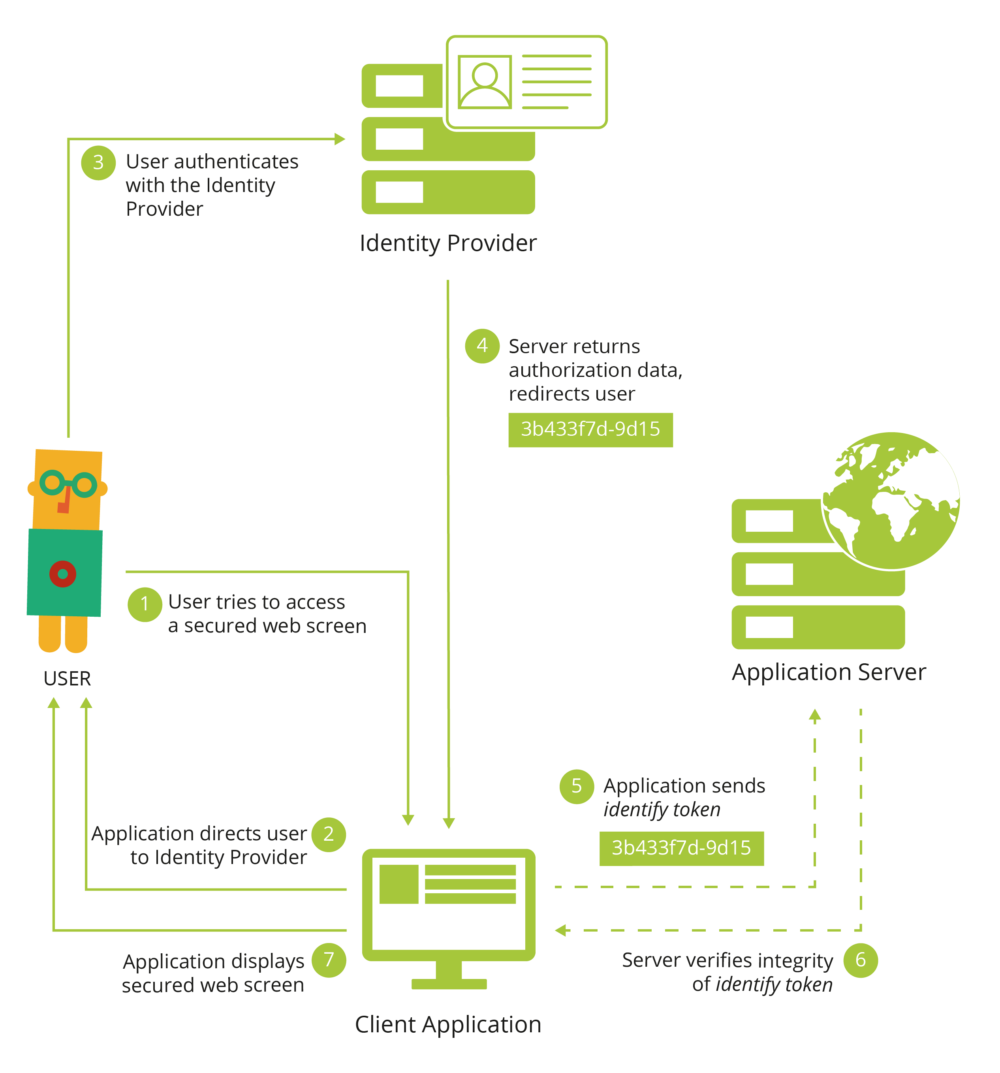
Federated Single Sign-On SPA flow
- The user tries to access an application’s secured web screen without being authenticated;
- The application redirects the user to the identity provider’s page (the user can check the browser details to confirm the authenticity of the login page);
- The user logs-in with the trusted identity provider and;
- The identity provider sends back to the application the agreed user details along with an identity token (in case server-side authentication is required);
- (optional) The application sends the identity token to the application server;
- (optional) The application server verifies the integrity of the identity token and uses its contents to perform any required server-side authentication-logic (setting up a user session, doing any provisioning needed);
- The application shows the user the secured web screen initially requested.
So, in this case, the entire authentication process takes place client-side, with an optional step of sharing the authentication outcome with the application server in a secure way: the identity token was produced by the Identity Provider, includes the user info and has mechanisms that the server can use to guarantee that it was not tampered with and is still valid.
Google Sign-In for OutSystems Reactive apps
We will now look at a practical example of this mechanism, by integrating a modern OutSystems application with the Google Identity Platform. Since both Reactive Web and Mobile apps rely on the same principles, we can provide a single solution for both, based on Google Sign-In for Websites.
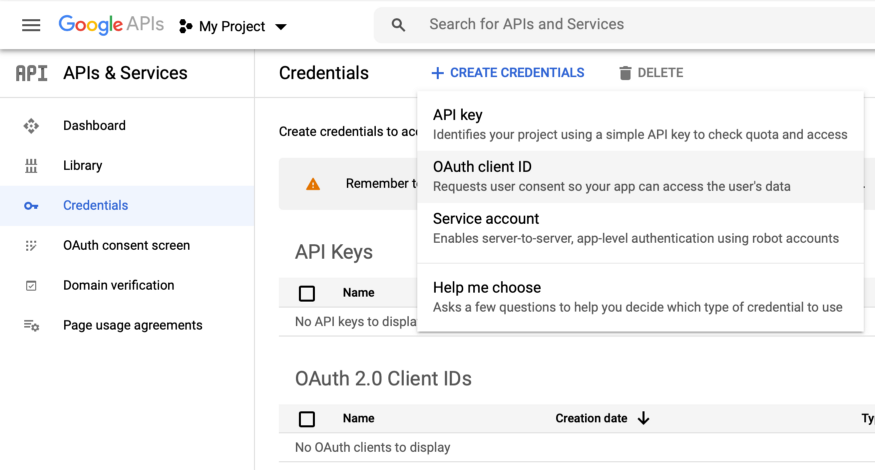
First we need to create the authorization credentials for our application. That can be done by accessing Google API’s Credentials page and create credentials (namely an OAuth client ID) for a Web Application. We will need to provide URIs for authorized JavaScript origins (the authorized redirect URIs would be used for traditional web applications). Once we’ve properly setup the authorization credentials for our application, we’re ready to start implementing the integration.
Loading the Google Platform Library
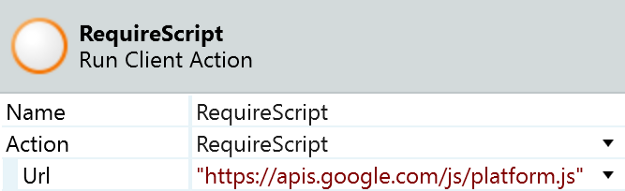
We’ll start by loading the Google Platform Library. This is a single JavaScript file hosted by Google that we need to include in any screen that requires any kind of integration with Google Sign-In. The simplest way of achieving this is by using the built-in RequireScript client action, passing it the URL for the JavaScript library (namely https://apis.google.com/js/platform.js). This action will guarantee that the library is loaded before the execution flow can continue.
In order to use any of the library functionality, we will need to specify our app’s client ID (the one we created earlier in the credentials page). According to the documentation, the library is expecting this ID to be set as specific meta information on the screen. We can use a JavaScript node to dynamically add a meta element to our screens, right after the library is loaded. The following code will only add this element once, and receives the OAuth Client ID as an input parameter.
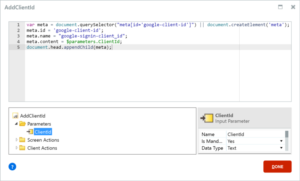
Specifying our app’s client ID
These two steps are essential in order to use any of the functionality of the Google Platform Library. All that is left to do is adding a Google Sign-In button. The library provides several options here, we’re going to choose to use the one that allows for some customization of the default sign-in button.
The gapi.signin2.render function will render a Google Sign-In button for us, inside the specified HTML element. It allows for some flexibility by accepting a few styling parameters as well (from the button dimensions, to its theme or even whether to display a shorter or longer label).
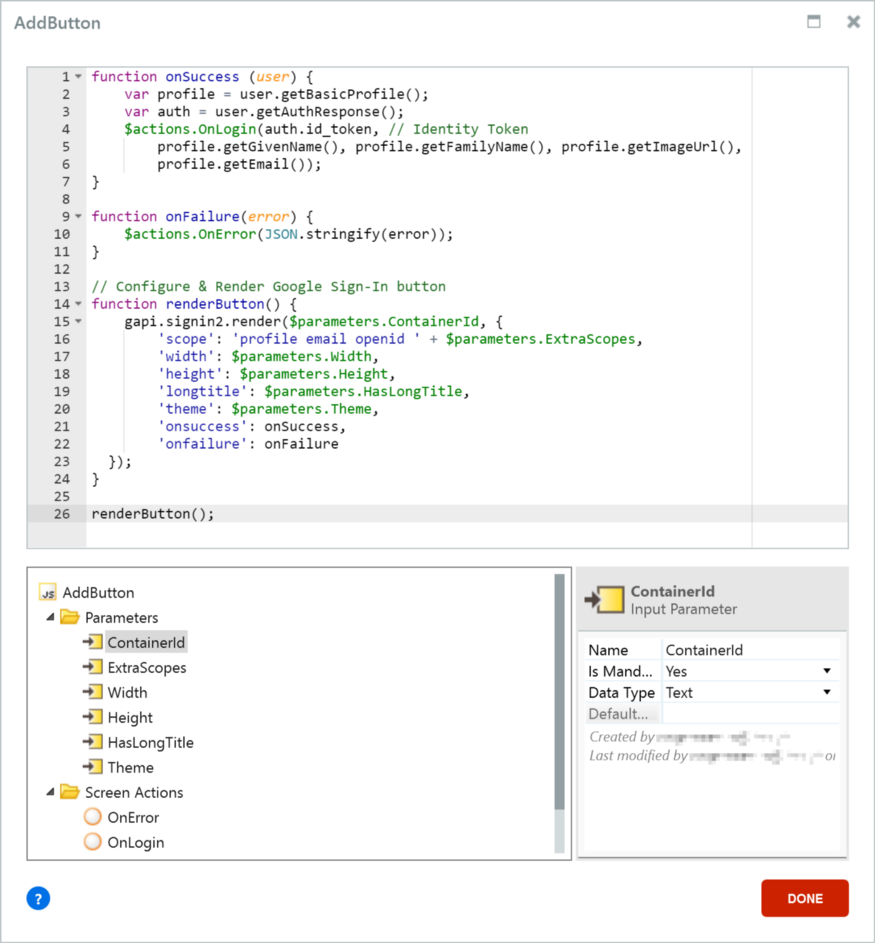
Rendering the Google Sign-In button
Of all the input parameters the render function has, a few are worth mentioning. The onSuccess and onFailure parameters allow us to pass functions that will be called respectively when the user successfully logs-in or fails to provide correct credentials.
The scope parameter allows us to request access to specific APIs and user information. The Google Sign-In API itself defines three possible scopes:
- profile, that allows access to basic profile information like the user’s name and picture;
- email, that allows access to the user’s email address; and
- openid, that requests authentication via OpenID Connect and provides access to a verifiable identity token.
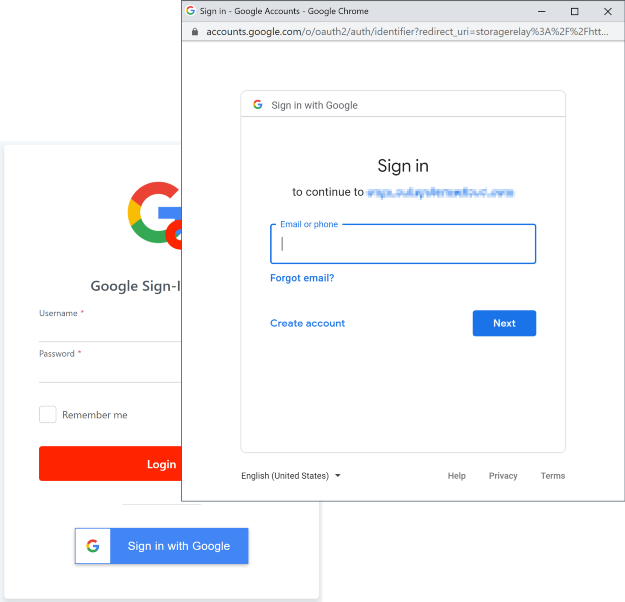
Placing the Google Sign-In placeholder container on the Login screen below the Login button and adding the logic above on the screen’s OnReady event allows us to successfully implemented the first 4 steps of the SPA Authentication flow. The Login screen will now show an extra Sign in with Google button, that will pop up a new browser window with the standard Google Sign in page, complete with pre-logged in accounts to authenticate with. Remember, credentials are never shared with the application.
In the above code, you will notice that both the onSuccess and onFailure JavaScript functions are calling two client actions and passing them input parameters with the outcome of the Google Sign-In flow: when successful, we will want to make use of the basic profile information, the email and also the identity token; when the sign-in failed, we may want to display info on the cause.
The OnLogin client action will then need to call a DoGoogleLogin server action, passing it the identity token, so that the server can validate it and perform server-side authentication (and possibly provision the user).
The identity token is a JSON Web Token issued by accounts.google.com that we can verify on the server-side. First, the server action needs to obtain the public keys from the JSON Web Key Set of the identity provider — in Google’s case, they would be accessible from https://www.googleapis.com/oauth2/v3/certs. Then, using the correct public key, the JWT can be decoded and validated. Finally, using the information stored as JWT claims the server action can determine whether it is a new user and provisioning is required, or simply login the user using the built-in platform mechanism.
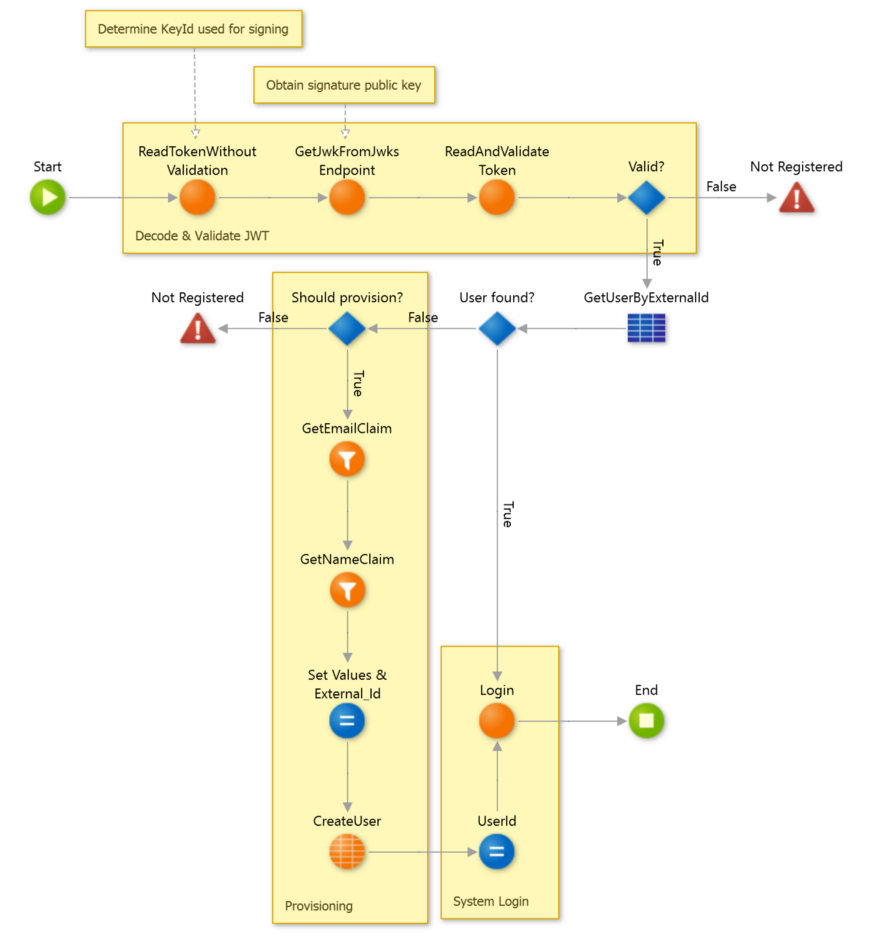
DoGoogleLogin server action with optional provisioning
Finally, authentication is successful and the user is logged in both on the client- and the server-side. If we want our screen to reflect that, we need to store the authenticated user info and display it on screen. In the example we stored the user’s name and profile image URL and modified the default UserInfo block to display those details for users that used Google to sign-in.
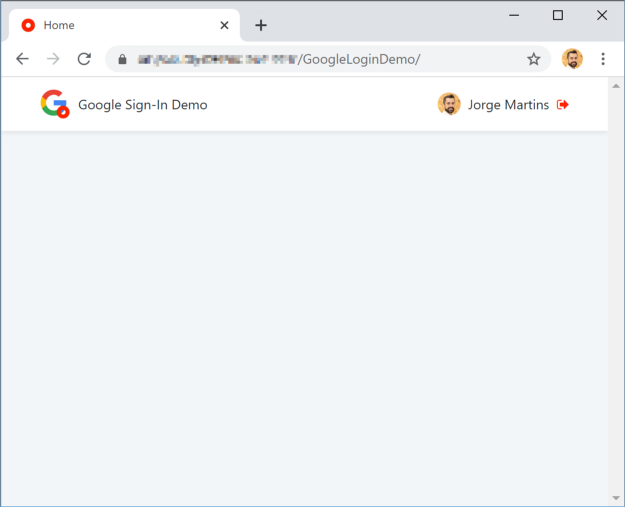
User successfully signed-in and showing their Google Account info
All is well that ends well, and so when we logout users that used Google to sign-in we will need to sign-out of the app on both Google and OutSystems. We will need to modify the UserInfo block, so that when the user tries to logout, the application will check whether the user is signed in from Google and if so use the GoogleAuth.signOut() function to sign out, and regardless always perform the default OutSystems logout.
The functionality described in this article is available on the OutSystems Forge as a pre-built component that can be used from both Reactive Web as well as Mobile applications (including PWAs). Feel free to examine how it was done and keep your feedback coming.


